
Desserts
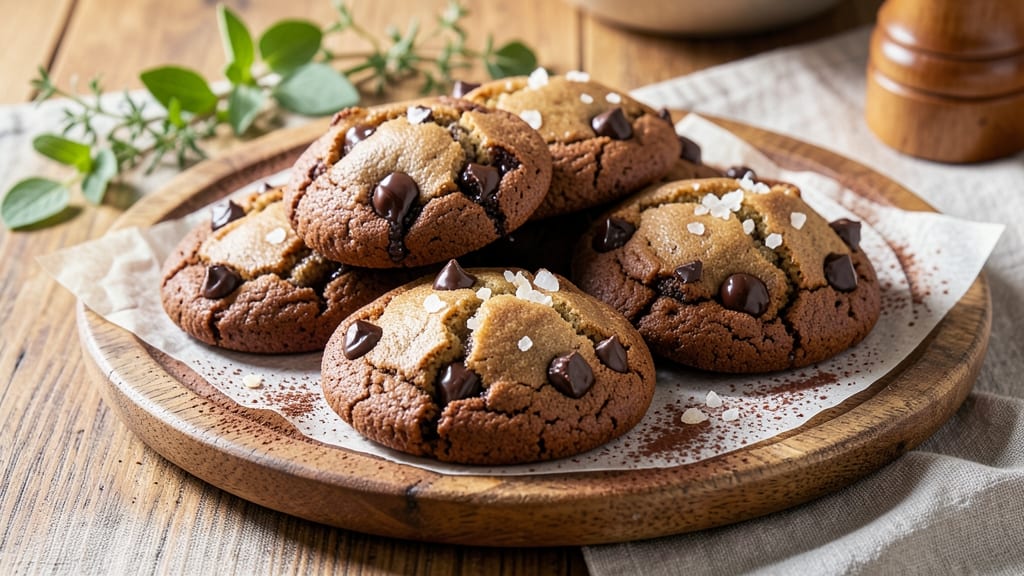
This basic chocolate biscuit recipe delivers the perfect balance of crispy edges and soft centers every time—no fancy techniques required. 💛 The secret lies in chilling the dough before baking, which prevents spreading and ensures that signature texture we all love.
I've baked these countless times for family gatherings, and they never fail to disappear from the plate.
What makes these biscuits special is the combination of rich cocoa powder and dark chocolate chunks that melt just enough to create pockets of gooey goodness.
The dough comes together in minutes with simple ingredients like all-purpose flour, unsalted butter, and granulated sugar, making this a foolproof recipe even for beginners. The baking time is short—just 10 to 12 minutes at 350°F—so you won't have to wait long for golden, aromatic biscuits.
By the time they come out of the oven, you'll have biscuits with a crackly exterior that gives way to a tender, slightly crumbly interior—ideal for dipping in milk or pairing with a warm cup of coffee.
The chocolate adds depth without overpowering the buttery flavor, making these versatile enough for breakfast or dessert. The best part? You can customize them with add-ins like nuts or white chocolate if you're feeling adventurous.
Whether you're baking for a crowd or treating yourself to a simple pleasure, these biscuits are a guaranteed hit. Here's everything you need to create them from scratch—no shortcuts, just pure, satisfying results.
Ingredients for basic chocolate biscuit
Twelve simple ingredients transform into golden, crisp-edged biscuits with gooey chocolate centers.
| Ingredient | Amount | Notes |
|---|---|---|
| All-Purpose Flour 🌾 | 3 cups | Sifted for light texture |
| Unsalted Butter 🧈 | 1 cup | Cold, cubed for cutting |
| Granulated Sugar 🍚 | ½ cup | Light brown preferred |
| Dark Chocolate Chunks 🍫 | ¾ cup | 70% cocoa, roughly chopped |
| Dutch-Processed Cocoa Powder 🍫 | ¼ cup | High-quality for rich flavor |
| Baking Powder 🍞 | 1 tbsp | Freshly measured |
| Salt 🧂 | 1 tsp | Diamond Crystal preferred |
| Vanilla Extract 🌸 | 1 tsp | Pure, high-quality |
| Whole Milk 🥛 | ½ cup | Cold for proper texture |
| Powdered Sugar 🍚 | ¼ cup | For dusting, optional |
The butter and flour are your foundation—use cold, unsalted butter straight from the fridge, and sift that flour (trust me, it makes a difference). For chocolate chunks, 70% cocoa bars from Trader Joe's or Ghirardelli melt beautifully without overpowering. The cocoa powder? Dutch-processed is essential—it dissolves smoothly and delivers that rich, velvety flavor. I always grab mine from Whole Foods because their bulk bins stay fresh longer. Skip the pre-sifted flour—sifting aerates the dough, giving you that perfect rise and crackly crust.
No dark chocolate? Semi-sweet chips work in a pinch, but they melt faster, so reduce to 0.5 cup. Running low on vanilla? Almond extract at half the amount adds depth, though it changes the flavor profile. The baking powder must be fresh—if it's over a year old, toss it. For a nutty twist, fold in 0.25 cup toasted pecans or walnuts. And if you're feeling fancy, swap the powdered sugar topping for a sprinkle of flaky sea salt—Maldon is my go-to—right before baking for a sweet-salty finish.
Chill the dough for at least 30 minutes—this isn't optional. The butter needs time to firm up, or your biscuits will spread into sad little pancakes. Store shaped biscuits on a wire rack until completely cool, then transfer to an airtight container with parchment between layers. Keeps at room temperature for 5 days or freeze for 3 months. Pro tip: Reheat in a 300°F oven for 5 minutes to restore that crispy edge. These reheat beautifully—perfect for late-night cravings or quick breakfasts.
Why You'll Love This Recipe
- No-Fuss Mixing: I swear by this dough—just cream butter and sugar, toss in flour, then fold in chocolate chunks. No food processor, no egg whites to whip, no fuss. My hands are always sticky, but the result? Always worth it.
- Rich Without Effort: That Dutch-processed cocoa powder? Game-changer. It’s deep, velvety, and doesn’t taste bitter like the cheap stuff. Plus, the chunks melt into gooey pockets—crisp edges, soft middle, and zero work to achieve it.
- Weeknight & Party Star: I keep a batch in the fridge for lazy mornings (warm them up in 5 minutes) or stash them in a tin for last-minute guests. Same recipe, different moments—breakfast, dessert, or a quick snack when the kids come home starving.
- Budget-Friendly Indulgence: Butter and flour are pantry staples, and a bag of chocolate chunks lasts forever. I make two dozen for under $3, freeze half, and still have leftovers that disappear faster than my willpower. Cheap joy, every time.
Step-by-step instructions for chocolate biscuits with crispy edges
Here's how to create perfectly crispy-edged biscuits with tender chocolate centers—every time.
👨🍳 Step 1: Cut Cold Butter into Dry Ingredients
Place the 1 cup cold, cubed unsalted butter in a large mixing bowl. Add the 3 cups sifted all-purpose flour, 0.25 cup Dutch-processed cocoa powder, 1 tbsp baking powder, and 1 tsp salt. Using a pastry cutter or two forks, work the butter into the dry ingredients until you achieve a coarse crumb texture with pea-sized butter pieces remaining.
This step is critical—don't overmix. You want to preserve those butter pockets that create steam during baking, which gives you those signature crispy edges. If your mixture looks like wet sand, add just 1 tablespoon more flour until it holds together when pressed. The butter should still be visible in chunks, not completely disappeared.
👨🍳 Step 2: Add Wet Ingredients for a Soft Dough
In a separate bowl, whisk together the 0.5 cup granulated sugar, 1 tsp vanilla extract, and 0.5 cup cold whole milk. Pour this mixture into the dry ingredients and gently stir with a wooden spoon until just combined. The dough will be shaggy and slightly sticky—this is perfect.
Here's where it gets fun—fold in the 0.75 cup dark chocolate chunks by hand using your fingers. Distribute them evenly throughout the dough, leaving a few larger chunks for dramatic melting moments in each bite. Turn the dough out onto a lightly floured surface and gently knead just 4-5 times until it comes together. Avoid overworking the dough or you'll develop gluten and lose that tender texture.
🥘 Step 3: Shape and Chill for Perfect Texture
Divide the dough into 12 equal portions (about 3 tablespoons each). Roll each portion into a ball, then flatten slightly into 1-inch thick discs. Arrange them on a parchment-lined baking sheet, leaving 2 inches between each biscuit—they'll spread slightly during baking. Cover the baking sheet with plastic wrap and refrigerate for 30 minutes. This chilling step is non-negotiable for maintaining shape and preventing excessive spreading.
While the dough chills, preheat your oven to 375°F. Here's the thing—don't skip the chilling. Cold dough means less spreading and more height, giving you that classic biscuit shape with crispy edges. If you're impatient, you'll end up with flat, cakey biscuits instead of the tender, flaky treats you're after.
🔥 Step 4: Bake Until Golden and Crispy
Bake the biscuits for 12-15 minutes until the edges are deep golden brown and the centers still look slightly soft. You're aiming for that perfect contrast—crispy outside, tender inside. The tops should be crackly, almost like a thin crust, with the chocolate chunks peeking through in melted pools.
I like to rotate the baking sheet halfway through for even browning. Watch them carefully after 10 minutes—ovens vary, and you want that crispy edge without burning. When you tap the bottom of a biscuit and it sounds hollow, it's ready. Transfer to a wire rack and let cool for 5 minutes before serving. The residual heat will finish cooking the centers while the exteriors stay crisp.
🍽️ Step 5: Dust and Serve Warm
While still warm, dust the tops generously with 0.25 cup powdered sugar using a fine-mesh sieve. This adds that final touch of sweetness and makes them look absolutely irresistible. Serve immediately for maximum crispiness—these biscuits soften quickly as they cool. The contrast of the crispy edges with the warm, gooey chocolate centers is what makes them special.
For the best experience, pair with a cup of hot coffee or tea. The chocolate chunks will continue melting slightly as they sit, creating pockets of rich, dark chocolate in every bite. Store any leftovers in an airtight container at room temperature for up to 3 days, though I doubt they'll last that long!
Pro Tips For Making Basic Chocolate Biscuit
- CHILL THE DOUGH: I learned this the hard way—skipping the 30-minute fridge rest makes for dense, flat biscuits. Even if you're impatient (yes, even if), give it time. The butter needs to firm up just enough so it doesn’t spread into pancakes when baking.
- MELT THE CHOCOLATE RIGHT: Toss those dark chocolate chunks into a microwave-safe bowl with 1 tablespoon of butter and 10 seconds of heat. Stir, then repeat until smooth—about 20 seconds total. Overdoing it burns the edges, and underdoing it leaves you with dry, crumbly chunks in your biscuits.
- WEIGH THE FLOUR: Scooping flour from the bag packs it down, adding extra moisture and making your biscuits tough. Use a kitchen scale for 220g (or spoon-and-sweep if you must) to keep the texture light. I know, it’s one more step, but it’s the thing that matters most.
- BAKE UNTIL GOLDEN: Pull them out when the edges are set but the centers still look slightly underdone—they’ll firm up as they cool. Overbaking turns them dry and chewy; underbaking leaves them gummy. A toothpick test works, but I trust my eyes more—look for that perfect golden-brown hue.
Dietary considerations for basic chocolate biscuit
Gluten-Free Adaptation
Swap the all-purpose flour for a 1:1 gluten-free baking flour blend like King Arthur Measure for Measure. Add ½ tsp xanthan gum to help bind the dough—gluten-free flours lack the natural elasticity.
Chill the dough longer (45 minutes) since gluten-free doughs spread more. For extra crispiness, brush tops with egg wash before baking. 🌾
Vegan Chocolate Biscuits
Replace the butter with 1 cup vegan butter (like Miyoko's) or coconut oil, and use almond milk instead of whole milk. For binding, add 1 tbsp ground flaxseed mixed with 3 tbsp water to the wet ingredients.
Use vegan dark chocolate chunks (70% cocoa) for melting pockets. These biscuits stay tender but lose some crispiness—bake at 350°F for 14-16 minutes. ✨
Nut-Free Option
Skip the chocolate chunks and fold in ½ cup dried cranberries or white chocolate chips (if avoiding nuts). For extra moisture, add 1 tbsp applesauce to the dough. The texture remains the same, but the flavor shifts to a fruity, buttery profile.
Store-bought white chocolate melts more predictably than dark, so it’s a great safe swap. 🍫
Lower Sugar Version
Reduce the granulated sugar to ¼ cup and replace the rest with ¼ cup honey or maple syrup. Use ½ cup sugar-free dark chocolate chunks (like Lily’s) to cut calories without sacrificing richness.
The biscuits will be slightly less sweet but still crispy. Dust with powdered erythritol instead of powdered sugar for a keto-friendly finish. 💛
Dairy-Free Modifications
Substitute the butter with 1 cup dairy-free margarine (like Earth Balance) or coconut oil. Use unsweetened almond milk and ensure your cocoa powder is dairy-free. The texture stays tender, but the flavor becomes slightly nuttier. For extra crispiness, bake at 375°F for 13-15 minutes. 🧈
Nutrition facts
Frequently asked questions
Why do my chocolate biscuits turn out flat instead of tall?
Flat biscuits usually mean the dough wasn't chilled long enough or the butter wasn't cold. Always refrigerate the shaped biscuits for at least 30 minutes before baking, and use cold butter straight from the fridge. If your kitchen is warm, chill the dough for 45 minutes instead. The butter needs time to firm up to create those steam pockets for lift!
Can I substitute cocoa powder for melted chocolate?
Yes, but the texture will differ. For every 1 oz of dark chocolate, replace with 1 tbsp cocoa powder minus 1 tsp (accounting for fat content). Melted chocolate adds moisture, so reduce milk by 1 tablespoon if substituting. The biscuits will be slightly denser but still delicious—just expect less dramatic chocolate pockets.
How do I prevent the chocolate chunks from sinking to the bottom?
Fold the chocolate chunks in gently by hand after mixing the wet ingredients, and distribute them evenly throughout the dough. For extra insurance, chill the dough for 1 extra hour before shaping. The cold butter will help keep the chocolate suspended. If you're worried, use semi-sweet chocolate chips instead—they're designed to stay distributed.
What's the best way to reheat stale chocolate biscuits?
For crispy edges, place biscuits on a baking sheet and warm in a 300°F oven for 5-7 minutes. For extra gooey chocolate, add 1 tsp milk to the powdered sugar before dusting and reheat. Microwaving (10 seconds) makes them soft but loses the crispiness. The oven method restores that perfect texture contrast every time!
Can I make these biscuits ahead of time?
Shape the biscuits and freeze them on a tray for 1 hour, then transfer to an airtight container with parchment between layers. Bake straight from frozen at 375°F for 15-18 minutes, adding 2-3 minutes to the baking time. They'll keep in the freezer for 3 months—perfect for last-minute baking! Just let them cool completely before storing.