
Desserts
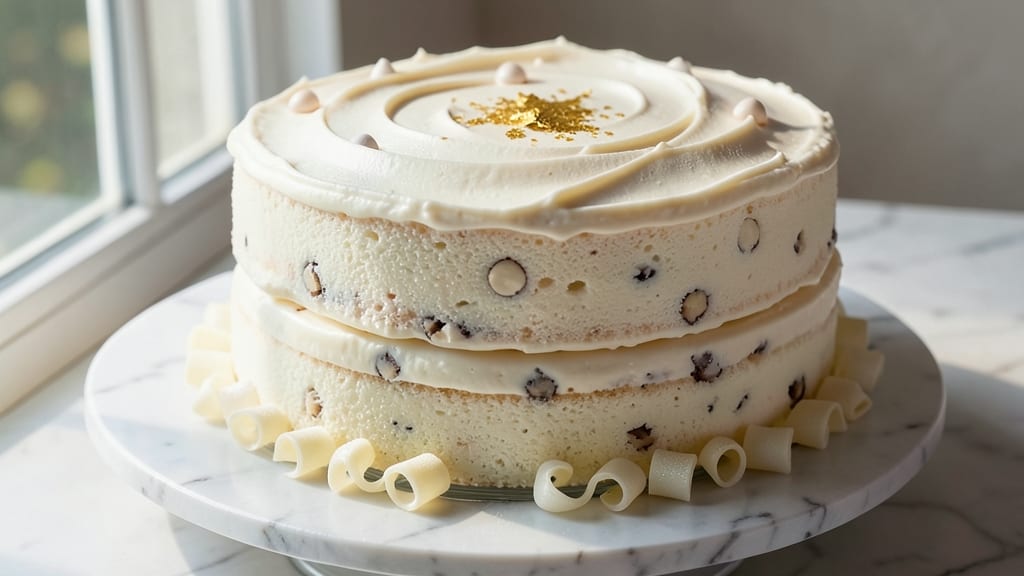
This basic white chocolate cake recipe delivers the perfect balance of tender crumb and rich vanilla-white chocolate flavor—no fancy techniques required. The secret lies in a simple yet precise method that creates light, airy layers without overmixing, ensuring every slice stays moist for days. I've perfected this over years of baking, and it's become my go-to for birthdays, celebrations, or just because.
What makes this recipe truly foolproof is the combination of all-purpose flour for structure, melted butter for moisture, and white chocolate that melts smoothly without graininess. The vanilla extract enhances the white chocolate's natural sweetness, while baking powder ensures those signature high, even layers.
With just 30 minutes of prep and 40 minutes in the oven, you'll have a cake that looks impressive yet was easy to make.
The result is a cake with a delicate crumb, subtle white chocolate flecks throughout, and a vanilla-kissed flavor that's neither too sweet nor too rich. The layers stay tender when properly cooled, making it perfect for frosting with buttercream, ganache, or even a simple powdered sugar glaze.
This is the kind of cake that disappears quickly but leaves everyone asking for the recipe.
Whether you're baking for a special occasion or treating yourself, this recipe scales beautifully and adapts to your preferred frosting. Let's get started with the step-by-step guide that ensures perfect results every time.
Ingredients for basic white chocolate cake
Eight simple ingredients transform into layers of cloud-like white chocolate perfection.
| Ingredient | Amount | Notes |
|---|---|---|
| All-Purpose Flour 🌾 | 2 ½ cups | Sifted for lightness, not pre-sifted |
| Granulated White Sugar 🍚 | 2 cups | Superfine preferred for smoothness |
| Unsalted Butter 🧈 | 1 ½ cups | Melted and cooled to room temp |
| Pure Vanilla Extract 🌸 | 2 tbsp | High-quality Madagascar bourbon |
| White Chocolate Chips 🍫 | 1 ½ cups | High-quality, 30% cocoa butter |
| Large Eggs 🥚 | 4 whole | Room temperature, separated |
| Baking Powder 🧂 | 2 tsp | Aluminum-free for stability |
| Salt 🧂 | ½ tsp | Fine sea salt preferred |
| Milk 🥛 | ¾ cup | Whole milk for richness |
The white chocolate is non-negotiable here—Ghirardelli or Callebaut are my go-tos, but any high-quality brand with at least 30% cocoa butter works. The butter? European-style unsalted like Plugrá or Land O'Lakes makes all the difference—it has a higher fat content that keeps the cake moist longer. Grab your vanilla extract from a specialty shop if you can—Madagascar bourbon vanilla has that deeper, more complex flavor that shines in this recipe. The flour? Always sift it yourself—pre-sifted flour loses its airiness, and this cake relies on that delicate crumb.
No vanilla extract? Vanilla bean paste at double the amount gives you those little specks of vanilla bean. Running short on white chocolate? Substitute with white chocolate bark—just chop it finely. Whole milk unavailable? Evaporated milk or half-and-half works in a pinch, but the cake will be slightly denser. For the eggs, if you're concerned about salmonella, pasteurized liquid eggs are a safe swap—just increase to 4.5 tablespoons. And if you're baking at high altitude? Reduce the baking powder to 1.75 teaspoons to prevent over-rising.
This cake stays moist for 3 days at room temperature if wrapped tightly in plastic. For longer storage, freeze the unfrosted layers for up to 3 months—thaw overnight in the fridge before frosting. I always bake an extra layer just in case—leftover cake freezes beautifully for quick breakfasts or dessert cravings. The white chocolate flecks keep the cake looking stunning even after a few days, making it perfect for make-ahead celebrations.
Why You'll Love This Recipe
- No Mixer Needed: I swear by this recipe when I’m too tired to pull out the stand mixer. Creaming butter and sugar by hand? Totally doable—just elbow grease and patience. The white chocolate chips melt right into the batter, so you don’t even need to preheat the oven until everything’s mixed.
- Rich Without Effort: That first bite of moist cake with pockets of melted white chocolate? It’s like dessert magic. The vanilla extract cuts through the sweetness just enough, and the butter keeps it tender—not dry or crumbly. Honestly, it tastes like a bakery slice but with half the fuss.
- Birthday or Boredom: This cake is my go-to for anything—birthday surprises, movie nights, or when I just need a treat. Layer it with whipped cream, or keep it simple with a dusting of powdered sugar. Even my picky teenage nephew asks for seconds, and that’s saying something.
- Budget-Friendly Luxury: Five ingredients, no specialty items. The white chocolate chips add that fancy touch without breaking the bank, and leftovers? They last in the fridge for days—perfect for when I bake once and eat twice. Plus, the butter and sugar are pantry staples I already have.
Step-by-step instructions for light-as-air white chocolate cake
Here's the method that guarantees tender layers with just the right vanilla-chocolate balance.
Prepare Your Mixing Tools and Ingredients
Start by preheating your oven to 350°F and greasing two 9-inch round cake pans with butter or nonstick spray. Line the bottoms with parchment paper circles for easy removal. I always use a light coating of butter first—it creates a better barrier than spray alone.
While the oven heats, sift together the 2.5 cups all-purpose flour and 2 teaspoons baking powder in a medium bowl. Set aside. This pre-sifting ensures your cake will be light and airy rather than dense. Whisk the 0.5 teaspoon salt into the flour mixture to distribute it evenly throughout.
Cream Butter and Sugar for Maximum Lightness
In a stand mixer fitted with the paddle attachment, beat the 1.5 cups unsalted butter (cooled to room temperature) and 2 cups granulated white sugar on medium speed for 3-4 minutes. You're looking for a pale, fluffy mixture that nearly doubles in volume. This creaming process incorporates air, which creates that signature light-as-air texture.
I press down on the butter mixture with my fingers every 30 seconds during the first minute to ensure it's fully combined. The mixture should be smooth and ribbon-like when you lift the paddle. If it looks grainy, continue beating for another 30 seconds—this is non-negotiable for proper texture.
Add Eggs and Vanilla for Rich Flavor
Add the 4 whole large eggs, one at a time, mixing on low speed after each addition until fully incorporated. Then add the 2 tablespoons pure vanilla extract and mix for another 30 seconds on low speed. The vanilla should be completely dissolved—you shouldn't see any streaks in the mixture.
Here's the thing—room temperature eggs incorporate better than cold ones. If your eggs are straight from the fridge, let them sit in warm water for 10 minutes first. This small step makes a huge difference in cake texture. The mixture should now be thick and mousse-like, with no visible egg streaks.
Alternate Dry and Wet Ingredients Gently
With the mixer on low speed, add one-third of the flour mixture and mix until just combined. Then add half of the 0.75 cup milk and mix again. Repeat this process, alternating between flour and milk, ending with flour. The goal is to mix just until the ingredients come together—overmixing develops gluten and makes the cake tough.
Fold in the 1.5 cups white chocolate chips by hand using a rubber spatula. I like to distribute them evenly throughout the batter, but a few clusters are fine—they'll melt beautifully during baking. The batter should be thick but pourable. If it's too thick, add another 1 tablespoon milk to help it flow smoothly into your pans.
Bake to Perfect Doneness
Divide the batter evenly between your prepared pans. Tap each pan gently on the counter to release any air bubbles. Bake for 25-30 minutes or until a toothpick inserted in the center comes out clean. The edges should be golden brown, but the tops might still look slightly underdone—they'll set as they cool.
I check for doneness at the 25-minute mark. If the toothpick comes out with moist crumbs but no wet batter, it's ready. If it comes out completely clean too early, your cake might be dry. The key is that moist crumbs indicate proper doneness. Let the cakes cool in their pans for 10 minutes before transferring to a wire rack to cool completely.
Pro Tips For Making Basic White Chocolate Cake
- MELT THE WHITE CHOCOLATE FIRST: I learned this the hard way—dumping cold white chocolate chips into warm butter creates a grainy, uneven batter. Microwave the chips in 20-second bursts with a splash of water until just melted (they’ll look glossy, not greasy), then stir into the butter while it’s still warm. The texture stays smooth, and the flavor integrates perfectly.
- WEIGH YOUR FLOUR—NO EXCUSES: Scooping flour from the bag packs it too tightly, leading to a dense cake. Use a kitchen scale for precision (1 cup all-purpose flour is about 125 grams loosely spooned and leveled). If you’re measuring by volume, fluff the flour first, then scoop—this gives you a lighter, airier crumb.
- BAKE UNTIL THE CENTER HITS 205°F: That toothpick test is unreliable with white chocolate cake. The center should read 205°F (96°C) on an instant-read thermometer—this guarantees a moist, fully set cake without drying out. If your oven runs hot, reduce the temp by 10°F and add 5-7 minutes to the bake time.
- FOLD IN CHOCOLATE LAST: Adding white chocolate chips too early melts them unevenly, creating pockets of goo. Save a handful to fold in at the very end—just until streaks disappear. For extra richness, replace ¼ cup of the all-purpose flour with cocoa powder (yes, even in white chocolate cake—it deepens the flavor without changing the color).
Storing and reheating this dish
Room Temperature Storage
Your freshly baked white chocolate cake stays moist and delicious for 3 days when stored properly at room temperature. Wrap each layer tightly in plastic wrap or place the whole cake in an airtight container with a slice of bread to absorb excess moisture.
I like using Glad Press'n Seal containers—they seal tightly and keep the cake looking fresh. Store in a cool, dark place away from direct sunlight to prevent the white chocolate from melting or the layers from drying out. 🌟
Refrigerator Preservation
For longer storage, refrigerate unfrosted layers for up to 5 days. The cold temperature helps preserve moisture, but the cake may dry out slightly. To revive it, let the cake sit at room temperature for 30 minutes before frosting or serving.
I recommend refrigerating only unfrosted layers—once frosted, the buttercream or glaze can separate or develop a film. If you must refrigerate a frosted cake, wrap it tightly and bring it to room temperature before serving. ✨
Freezing for Later
Freeze unfrosted cake layers for up to 3 months for make-ahead convenience. Wrap each layer individually in plastic wrap, then place in a freezer bag with all the air removed. I use Ziploc Freezer Bags because they seal tightly and prevent freezer burn.
Thaw overnight in the refrigerator before frosting. For a quick thaw, place the wrapped cake in a bowl of cool water for 20-30 minutes—this speeds up the process without compromising texture. 💫
Reheating Slices
If you have leftover slices, reheat them gently to restore moisture and warmth. Wrap the slice in a damp paper towel and microwave on low power (50%) for 10-15 seconds. For a stovetop method, place the slice on a skillet over low heat for 2-3 minutes per side.
Avoid high heat—it can dry out the cake. I also love warming slices in a 200°F oven for 5 minutes for a gentle, even heat that keeps the texture perfect. 🔥
Frosting After Storage
If your cake has been refrigerated or frozen, let it come to room temperature before adding frosting. Cold cake can cause buttercream to melt or become grainy. I recommend adding a thin layer of vanilla buttercream first to help the final frosting adhere better.
For a quick fix, chill the frosting slightly in the refrigerator for 10 minutes before applying it to cold cake layers. This helps create a smoother finish and prevents the frosting from sliding off. 💛
Nutrition facts
Frequently asked questions
Why does this recipe use white chocolate instead of milk or dark?
White chocolate creates a lighter, sweeter flavor profile that pairs perfectly with vanilla. Unlike milk or dark chocolate, it contains no cocoa solids—just cocoa butter, sugar, and milk solids—which gives this cake its delicate, airy texture without overpowering sweetness. The high-quality white chocolate chips also melt smoothly during baking, creating beautiful flecks throughout each layer.
Can I make this cake without a stand mixer?
Use a hand mixer or even a sturdy whisk. For the butter and sugar, beat by hand for 5-7 minutes until pale and fluffy—just keep at it! The key is patience; stop when the mixture looks light and ribbon-like. For eggs and vanilla, use a whisk to combine gently. The alternating dry/wet method works perfectly by hand too—just fold carefully to avoid overmixing.
What's the best frosting for this cake?
Vanilla buttercream is classic, but you can't go wrong with white chocolate ganache or a simple powdered sugar glaze. For extra richness, try a cream cheese frosting—it balances the sweetness beautifully. Pro tip: Let the cake cool completely before frosting to prevent melting. If your frosting is too soft, chill it for 10 minutes before applying.
My cake turned out dense—what went wrong?
Overmixing the batter develops gluten, making the cake tough. Mix just until combined when adding flour and milk. Also check your butter—if it was too cold, it wouldn't cream properly. For next time, let all ingredients (especially eggs and butter) reach room temperature. Finally, don't overbake—pull the cake when a toothpick comes out with moist crumbs.
Can I substitute white chocolate with something else?
For a similar flavor, use 1.5 cups white baking chocolate (like Callebaut) or finely chopped white chocolate bark. Need a non-chocolate option? Try 1 cup marshmallow fluff mixed with 0.5 cup powdered sugar—it adds sweetness and moisture. Just reduce the sugar slightly in the batter to balance the extra sweetness.