
Desserts
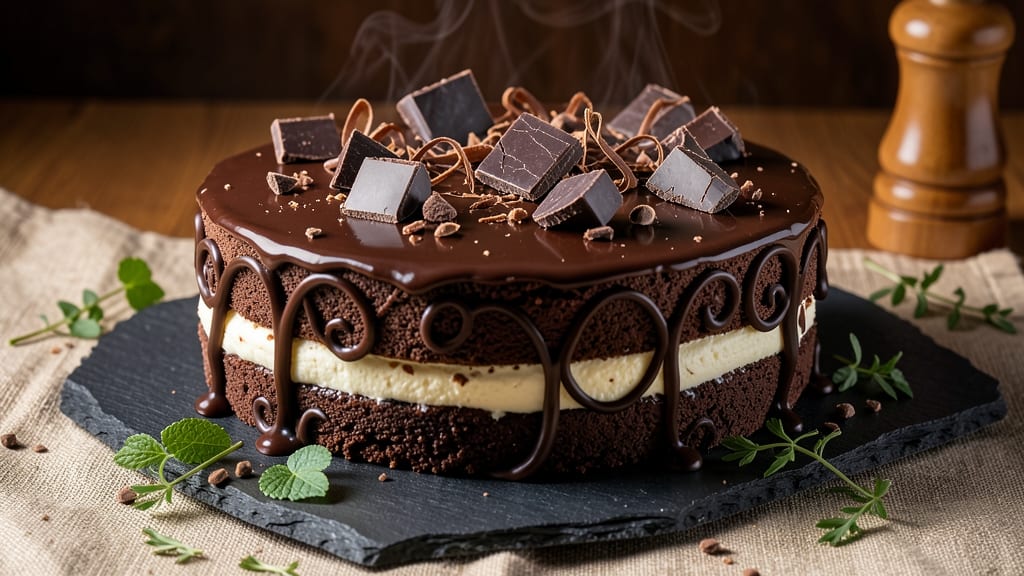
This Belgian chocolate fudge cake delivers decadent layers of rich, moist cake, velvety fudge, and coffee-infused ganache that taste like a Brussels café dessert. The secret lies in dark Belgian chocolate and a precise baking technique that ensures a triple-layered texture—soft, fudgy, and perfectly set.
I’ve perfected this recipe after years of testing, balancing the bitter-sweet harmony of Belgian chocolate with just the right amount of espresso to deepen the flavor without overpowering it.
The cake itself is light yet dense, thanks to a precise ratio of all-purpose flour, cocoa powder, and buttermilk that keeps it moist for days. Between each layer, a smooth fudge filling made with melted chocolate and cream adds a luxurious, almost pudding-like texture.
What truly sets this apart is the ganache streaks—thin ribbons of coffee-infused chocolate that cut through each slice, adding a bold, aromatic finish that feels indulgent yet balanced.
By the time you’re done, you’ll have a cake that looks as impressive as it tastes—golden layers with glossy ganache swirls and a crisp yet tender crumb.
The coffee notes in the ganache elevate the chocolate, making every bite feel like a mini dessert experience, not just a slice of cake. This is the kind of dessert that wows guests and leaves them asking for the recipe.
Perfect for holiday gatherings, anniversary celebrations, or simply treating yourself, this cake keeps well for up to 5 days when stored properly. The assembly process is straightforward, but the flavor development happens over time, so let it rest before slicing. Ready to bake? Let’s get started.
Ingredients for belgian chocolate fudge cake
Dark Belgian chocolate, velvety fudge layers, and coffee-infused ganache create this showstopping dessert masterpiece.
| Ingredient | Amount | Notes |
|---|---|---|
| Dark Belgian Chocolate (70% Cocoa) 🍫 | 8 oz | High-quality, finely chopped |
| Unsalted Butter 🧈 | 1 ½ cups | Cold, cubed for creaming |
| All-Purpose Flour 🌾 | 2 ½ cups | Sifted, for light texture |
| Granulated Sugar 🍚 | 2 cups | Superfine preferred |
| Cocoa Powder (Natural) 🍫 | ¾ cup | High-quality Dutch-processed |
| Buttermilk 🥛 | 1 cup | Room temperature |
| Eggs (Large) 🥚 | 4 whole | Room temperature |
| Vanilla Extract 🌿 | 2 tsp | Pure Madagascar preferred |
| Instant Espresso Powder ☕ | 2 tsp | For coffee infusion |
| Heavy Cream 🥛 | 1 ½ cups | Full-fat for richness |
| Heavy Whipping Cream 🥛 | 1 cup | Chilled for ganache |
| Salt 🧂 | ½ tsp | Fine sea salt |
| Baking Powder 🍞 | 1 tsp | Aluminum-free |
| Dark Chocolate (70% Cocoa) for Ganache 🍫 | 12 oz | Same brand as cake |
The dark Belgian chocolate is non-negotiable here—Valrhona or Callebaut are industry standards, but Ghirardelli 70% cocoa works beautifully too. Look for bars with at least 70% cocoa for that perfect bitter-sweet balance. Chop it finely (or buy pre-chopped) for even melting. The cocoa powder should be Dutch-processed—it's smoother and less acidic. Whole Foods or specialty baking stores carry premium brands, but don't overlook the baking aisle at Walmart or Kroger for reliable options. For the espresso powder, Starbucks or Lavazza brands provide consistent flavor without bitterness. Pre-ground is fine, but avoid instant coffee granules—they can clump.
No Belgian chocolate? High-quality Mexican chocolate or Lindt Excellence 70% will work in a pinch, though the flavor profile shifts slightly. Running out of buttermilk? Mix 1 tablespoon lemon juice or vinegar with 1 cup milk and let sit for 5 minutes. For the ganache, heavy whipping cream must be chilled—room temperature cream creates a grainy texture. The baking powder is crucial here—aluminum-free is key to prevent metallic aftertaste. Need a flour substitute? King Arthur Measure for Measure works 1:1, though texture may vary slightly. The vanilla extract should be pure Madagascar bourbon—imitation extracts contain artificial flavors that won't elevate this recipe. For the coffee infusion, instant espresso powder is more reliable than brewed coffee, which can introduce water and dilute the flavor.
Store the cake components separately: cake layers wrapped in plastic, filling in an airtight container, and ganache in a sealed jar. The assembled cake keeps for up to 5 days at room temperature, but flavor develops overnight, so assemble at least 12 hours before serving. For longer storage, freeze the unassembled layers for up to 3 months—thaw overnight in the fridge before assembly. The ganache can be reheated gently in 30-second bursts in the microwave if it thickens. For presentation, dust with powdered sugar or cocoa powder right before serving to maintain that café-style look. Always use parchment paper between layers to prevent sogginess.
Why You'll Love This Recipe
- Here’s what sold me: the 70% cocoa isn’t bitter or harsh—it’s deep, smooth, and lets the butter’s richness shine. The natural cocoa powder adds that velvety texture, so every bite is ridiculously good without tasting like a dessert cliché.
- No-Fuss Mixing: I swear by this—just melt butter and chocolate together, then fold in dry ingredients. No whisking, no sifting, no fuss. That Belgian chocolate? It melts into a silky puddle that makes the whole process feel like a treat.
- Rich Without Overpowering: Here’s what sold me: the 70% cocoa isn’t bitter or harsh—it’s deep, smooth, and lets the butter’s richness shine. The natural cocoa powder adds that velvety texture, so every bite is ridiculously good without tasting like a dessert cliché.
- Weeknight Crowd-Pleaser: Between us, this feeds six but costs less than takeout. Double the batter, bake in two pans, and you’ve got dinner covered—no one will guess it’s just flour, sugar, and chocolate doing all the work. (Yes, even on a Tuesday night.)
Step-by-step instructions for Belgian chocolate fudge cake
Master this decadent triple-layered cake with precise technique and professional finishing.
Cream Butter, Sugar, and Chocolate for Maximum Flavor
In a stand mixer fitted with the paddle attachment, combine the 1.5 cups unsalted butter, 2 cups granulated sugar, 8 oz dark Belgian chocolate (70% cocoa), and 2 tsp instant espresso powder. Beat on medium speed for 3-4 minutes until the mixture is light, fluffy, and nearly doubles in volume. You'll notice the chocolate melts completely and the butter becomes pale—this ensures proper aeration for a tender crumb.
Here's where the coffee infusion happens: the espresso powder dissolves into the butter, creating subtle coffee notes that complement the chocolate. I like to press the chocolate pieces against the sides of the bowl with a spatula during mixing to ensure even melting. Scrape down the bowl occasionally to prevent temperature fluctuations that could cause graininess.
Incorporate Eggs and Dry Ingredients for Perfect Texture
Add the 4 whole eggs (large) one at a time, mixing on low speed for 30 seconds after each addition until fully incorporated. The mixture should be thick and ribbon-like. Add the 2 tsp vanilla extract and mix for another 10 seconds—this ensures even distribution of the vanilla's aromatic compounds.
In a separate bowl, whisk together the 2.5 cups all-purpose flour, 0.75 cup cocoa powder (natural), 1 tsp baking powder, and 0.5 tsp salt. Sift the dry ingredients directly into the wet mixture while mixing on low speed for 30-45 seconds until just combined. You should still see small flour streaks—overmixing develops gluten and creates a tough cake. Stop mixing immediately when the batter comes together.
Fold in Buttermilk for Moisture and Flavor Balance
Remove the mixer bowl and gently fold in the 1 cup buttermilk using a silicone spatula. The buttermilk adds moisture and acidity that balances the richness of the chocolate and butter. Fold just until combined—don't overmix or you'll deflate the air incorporated during creaming. The batter should be thick but pourable, with a few streaks of buttermilk visible.
This is the moment that matters: the buttermilk's acidity reacts with the baking powder, creating tiny air pockets that contribute to the cake's tender crumb. For best results, let the batter rest for 15-20 minutes at room temperature before baking. This allows the flour to fully hydrate and the baking powder to activate completely, resulting in a more even rise.
Bake Layers at Precision Temperature for Even Doneness
Preheat your oven to 350°F and grease three 8-inch round cake pans with nonstick spray. Line the bottoms with parchment paper circles. Divide the batter evenly among the pans—each should be filled about ⅔ full. Bake for 25-30 minutes or until a toothpick inserted in the center comes out with moist crumbs (not wet batter).
Your oven might run hot, so start checking at the 20-minute mark. The edges should be set while the centers still look slightly underdone. If the tops brown too quickly, tent the pans with aluminum foil. Let the layers cool in the pans for 10 minutes before transferring to a wire rack to cool completely. Real talk: don't skip the cooling step—warm layers will collapse when assembling.
Prepare Coffee-Infused Ganache for Decadent Streaks
In a heatproof bowl set over a saucepan of simmering water (double boiler), combine the 12 oz dark chocolate (70% cocoa) for ganache and 1.5 cups heavy cream. Stir gently until the chocolate melts completely and the mixture reaches 110°F—this temperature ensures the ganache sets properly but remains glossy. Remove from heat and whisk in 2 tsp instant espresso powder until fully dissolved.
Let the ganache cool to 90°F (about 15 minutes) while stirring occasionally. It should thicken slightly but remain pourable. For the streaks, pour the ganache into a piping bag fitted with a ¼-inch round tip. Pipe ½-inch wide zigzag patterns across each cooled cake layer, spacing them 1 inch apart. Chill the assembled cake for 2 hours before slicing—this allows the ganache to set completely for clean, professional-looking streaks.
Pro Tips For Making Belgian Chocolate Fudge Cake
- Temper That Chocolate: Belgian chocolate’s 70% cocoa means it’s temperamental—melt it gently in a heatproof bowl over barely simmering water (not boiling) and stir every 30 seconds. I learned this the hard way when a batch seized mid-stir; now I watch the water like a hawk and keep the bowl off-center so no steam hits the sides.
- Whisk Butter Until Pale: Cream the butter and sugar until it’s actually pale yellow, not just thickened. This takes 3–5 minutes with a stand mixer—skip this, and your cake will taste flat. (Yes, even if your arms protest.)
- Sift the Cocoa Twice: Natural cocoa powder clumps like a grumpy cat. Sift it before measuring, then sift it again after mixing with the dry ingredients. I was skeptical until I tried it—the texture is smoother, and the crumb stays lighter.
- Don’t Overbake the Fudge Layer: Pull the cake from the oven when the edges are set but the center still jiggles slightly—it’ll firm up as it cools. Overbaking turns that rich fudge layer into a dense brick. (Trust the toothpick test, but don’t wait for it to come out clean.)
Make-ahead tips for this belgian chocolate fudge cake
Batter Prep Ahead
Prepare the cake batter up to 24 hours in advance and store it in an airtight container in the refrigerator. The flavors deepen as the buttermilk and espresso powder meld with the chocolate.
When ready to bake, let the batter sit at room temperature for 30-45 minutes to reach a consistent temperature—this prevents temperature shock in the oven and ensures even baking. I like to cover the container with plastic wrap pressed directly onto the surface to prevent a skin from forming. 💫
Layer Assembly Timeline
Assemble the cake layers and fudge filling 12-24 hours before serving for optimal flavor development. Spread the fudge filling evenly between layers using an offset spatula, pressing gently to eliminate air pockets.
For the ganache streaks, work quickly—pour the ganache into a piping bag with a ¼-inch round tip and pipe ½-inch wide zigzags while the cake layers are still chilled but not frozen. This creates clean, professional-looking streaks that set beautifully. 🍫
Fudge Filling Prep
Make the fudge filling 1 day ahead and store it in an airtight container in the fridge. The filling should be thick but spreadable—if it sets too firm, microwave it in 10-second bursts until it reaches a smooth, pudding-like consistency.
To prevent the filling from absorbing into the cake layers, spread it on parchment paper first, then transfer it to the cake using the parchment as a guide. This technique keeps the layers clean and the filling vibrant. ✨
Freezing Unassembled Layers
For long-term storage, freeze the baked cake layers and fudge filling separately in airtight containers for up to 3 months. Thaw the layers overnight in the fridge before assembling. The ganache can be reheated gently in 30-second microwave bursts until it reaches 90°F—stirring between bursts prevents graininess.
When reassembling after freezing, let the cake sit at room temperature for 30 minutes before slicing to ensure clean cuts. 🥶
Ganache Storage Tips
Store the coffee-infused ganache in a sealed jar at room temperature for up to 5 days, or refrigerate for up to 2 weeks.
If it thickens in the fridge, reheat it gently using a double boiler until it reaches 110°F, then cool it back to 90°F before piping.
For a quicker fix, place the jar in a bowl of warm water for 2-3 minutes—this maintains the ganache's glossy texture without overheating. 💡
Serving Prep
Dust the assembled cake with powdered sugar or cocoa powder right before serving to maintain that café-style presentation. For a dramatic finish, garnish each slice with a sprinkle of crushed praline or a small dollop of whipped cream.
If you're serving guests, slice the cake 1 hour before serving to allow the ganache streaks to set properly. The cake keeps well at room temperature for 5 days, but the flavor peaks after 24-48 hours when all the components meld together. 🍽️
Nutrition facts
Frequently asked questions
Can I substitute regular chocolate for Belgian chocolate?
While you can use high-quality dark chocolate (70% cocoa) like Ghirardelli or Lindt, Belgian chocolate offers a unique depth due to its precise cocoa sourcing and higher fat content. For the best results, look for brands like Callebaut or Valrhona, which provide that signature Belgian richness. If substituting, use the same cocoa percentage and chop it finely for even melting.
Why does my cake turn out dense instead of light?
Overmixing the batter or skipping the 15-20 minute rest before baking are common culprits. Also, ensure your buttermilk is room temperature and your oven is properly calibrated (use an oven thermometer). For extra lightness, sift the dry ingredients and fold them gently into the wet mixture until just combined.
How do I make the ganache streaks look professional?
Chill the cake layers completely before piping the ganache, and use a ¼-inch round tip for clean, even streaks. Pipe ½-inch wide zigzags while the cake is still chilled but not frozen. Let the ganache cool to 90°F before piping—this ensures it sets smoothly. Work quickly and keep the piping bag slightly tilted to prevent drips.
Can I make this cake without espresso powder?
Yes, but the coffee infusion adds depth to the chocolate flavor. For a substitute, use 1 tsp instant coffee granules dissolved in 1 tbsp hot water and added to the butter mixture. Avoid brewed coffee—it contains too much liquid and can alter the texture. If omitting entirely, reduce the vanilla extract to 1 tsp to balance the flavor.
How do I prevent the fudge filling from leaking?
Ensure the cake layers are fully cooled and use parchment paper between layers to prevent sogginess. Spread the filling evenly, leaving a ½-inch border around the edges. Chill the assembled cake for 2 hours** before serving—this helps the filling set properly. For extra stability, brush the cake layers with a thin layer of apricot jam before adding the filling.