
Desserts
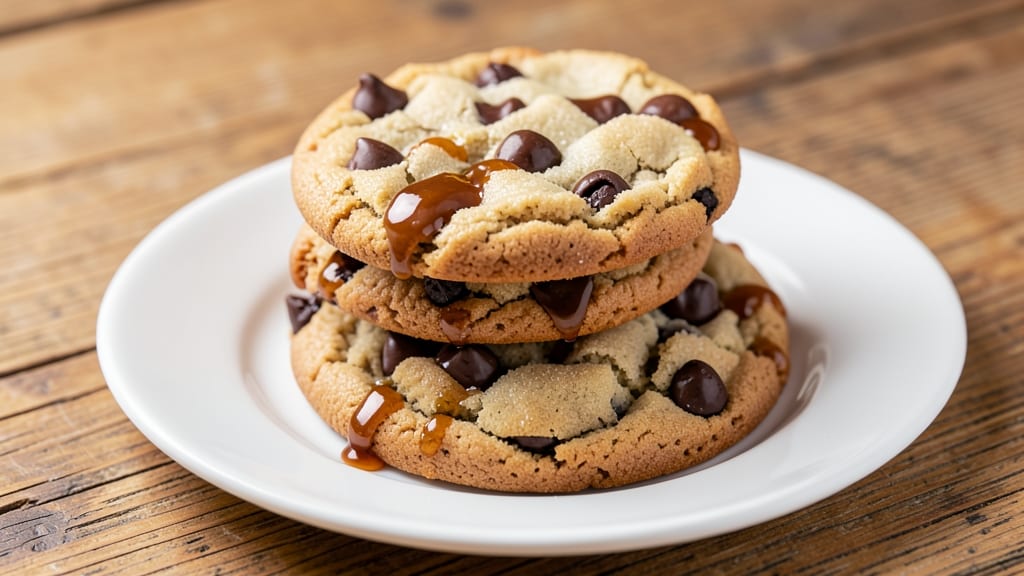
This best tasting chocolate chip cookie recipe delivers the perfect balance of crispy edges, chewy centers, and pools of molten chocolate—every time. 💛 The secret lies in a double-bake technique and precise ingredient ratios that transform simple pantry staples into cookies that taste like they came straight from a bakery.
I've tested countless variations, and this method consistently produces cookies with that signature texture and rich, buttery flavor.
What sets these cookies apart is the combination of brown and white sugar, which creates a caramelized depth while maintaining the classic cookie texture. A 30-minute dough rest allows the flour to hydrate fully, ensuring even baking and that signature spread.
The dough is baked just until the edges are golden, then returned to the oven for a second bake that creates crispy edges while keeping the centers tender.
By the time you pull them from the oven, you'll have cookies with crispy, golden edges, soft yet sturdy centers, and chocolate chips that stay melty even after cooling.
The aroma alone will have everyone gathering in the kitchen, and the first bite delivers that perfect balance of sweetness, crunch, and gooey chocolate. These are the kind of cookies that disappear quickly—if they last that long.
Perfect for holidays, bake sales, or satisfying a sweet craving, this recipe scales beautifully for any occasion. The key is patience and precision, but the results are worth every minute. Let's get baking!
Ingredients for best tasting chocolate chip cookie
These 11 simple ingredients create bakery-style cookies with crispy edges and gooey chocolate rivers—every time!
| Ingredient | Amount | Notes |
|---|---|---|
| Unsalted Butter 🧈 | 1 cup | Cold, cubed for even mixing |
| Granulated White Sugar 🍚 | ¾ cup | For crispy edges |
| Packed Brown Sugar 🍚 | ¾ cup | For chewy centers |
| Large Eggs 🥚 | 2 whole | Room temperature preferred |
| Pure Vanilla Extract 🌿 | 2 tsp | High-quality, pure vanilla |
| All-Purpose Flour 🌾 | 3 ½ cups | Spooning, not scooping |
| Baking Soda 🧂 | 1 tsp | For lift and texture |
| Diamond Crystal Kosher Salt 🧂 | 1 tsp | Adjust to taste |
| Semisweet Chocolate Chips 🍫 | 2 ½ cups | Enjoy Life brand for allergies |
| Flaky Sea Salt 🧂 | 1 tbsp | For finishing sprinkle |
| Granulated Sugar 🍚 | ¼ cup | For post-bake sprinkle |
The butter matters most here—use cold, cubed (not melted) for that perfect texture. Land O'Lakes unsalted is my go-to, but any good brand works. Brown and white sugar together create the signature caramel depth while keeping the centers tender. King Arthur flour is my secret for consistent texture, but any all-purpose will do. Pro tip: Measure flour by spooning it into the cup and leveling off—don't scoop directly from the bag. The chocolate chips? Enjoy Life brand is my backup for allergy-friendly baking, but classic Nestlé works too. Grab extra—you'll want them!
No vanilla extract? Vanilla bean paste works perfectly, or scrape seeds from a pod. Short on chocolate chips? Chopped chocolate bars (70% dark or milk) give a more professional look. The flaky sea salt is non-negotiable—it cuts the sweetness and adds that bakery touch. Maldon is my favorite, but any flaky salt works. For a nutty twist, swap half the chocolate chips for chopped walnuts or pecans. And if you're feeling fancy, toss in white chocolate chips for contrast. The dough needs a 30-minute rest—trust me on this, it makes all the difference!
Butter and dough keep best in the fridge for 3 days, wrapped tightly. Chocolate chips last 1 year in the pantry, but once opened, store them in the freezer. Baked cookies? Room temperature in an airtight container for up to 5 days, or freeze for 3 months. For extra crunch, sprinkle with the extra sugar and flaky salt right after baking—worth the extra minute!
Why You'll Love This Recipe
- Five-Ingredient Magic: I swear, that butter-sugar ratio—cream of unsalted butter cut into brown sugar until it’s sandy but not greasy—is where the real magic happens. No weird substitutions, no extra steps, just pure, foolproof dough that tastes like nostalgia.
- Chewy-Crisp Balance: Between us, the secret’s in the eggs. One at room temp, cracked right into the mix, and you get that perfect texture—edges crisp enough to hold a bite, centers so soft they melt in your mouth. (Yes, even on a Tuesday night.)
- Party in a Jar: These freeze like a dream—just scoop dough into a bag, seal it tight, and pull out a batch whenever you need a last-minute treat. Or bake a tray ahead for movie nights, book club, or because someone’s birthday is always sneaking up.
- Budget-Friendly Bliss: A single stick of butter and a cup of sugar stretch further than you’d think, especially when you’re using the leftover dough for ice cream sandwiches or crumbled over ice cream. Honestly, I’ve made a whole meal out of these—trust me.
Step-by-step instructions for double-baked chocolate chip cookies
Here's how to bake the ultimate cookies—crispy edges, gooey centers, and rivers of melted chocolate.
👨🍳 Step 1: Cream Butter and Sugars to Cloudy Perfection
In a stand mixer fitted with the paddle attachment, beat the 1 cup unsalted butter on medium speed until completely smooth. Add the 0.75 cup granulated white sugar and 0.75 cup packed brown sugar, then mix for 3-4 minutes until the mixture becomes pale and fluffy. You'll see it nearly double in volume—this is your signal to stop.
I press down on the butter mixture with a spatula to check for readiness: when it leaves clean streaks that hold their shape, it's perfect. This creaming step incorporates air, which creates those beautiful crackly tops and helps the cookies spread just enough. If your mixer starts to struggle, switch to low speed to prevent splattering.
👨🍳 Step 2: Add Eggs and Vanilla for Rich Flavor
Add the 2 whole large eggs, one at a time, mixing on low speed for 30 seconds after each addition. Then stir in the 2 teaspoons pure vanilla extract until fully combined. The mixture might look slightly curdled at first, but don't worry—it'll smooth out when we add the dry ingredients.
Here's the thing—room temperature eggs blend more smoothly, but if yours are cold, no stress. Just mix a bit longer until fully incorporated. The vanilla extract should be high-quality; I can taste the difference between pure and imitation in every bite of these cookies.
👨🍳 Step 3: Combine Dry Ingredients and Fold in Chocolate
In a separate bowl, whisk together the 3.5 cups all-purpose flour, 1 teaspoon baking soda, and 1 teaspoon diamond crystal kosher salt. With the mixer on low speed, gradually add the dry ingredients to the wet mixture, mixing just until combined. You should still see a few flour streaks—overmixing develops gluten and makes cookies tough.
Remove the bowl from the mixer and gently fold in the 2.5 cups semisweet chocolate chips using a silicone spatula. Here's my trick: I press some of the dough into the chocolate chip bag, then fold that back in. This ensures every bite has those perfect pockets of melted chocolate.
⏰ Step 4: Chill the Dough (This Changes Everything!)
Cover the dough bowl with plastic wrap and refrigerate for at least 30 minutes—I prefer 1 hour or even overnight. This chilling step is non-negotiable. It solidifies the butter, preventing excessive spreading, and allows the flour to fully hydrate for better texture.
Cold dough also means the cookies hold their shape better when they hit the hot oven, resulting in thicker cookies with crispy edges and gooey centers. Pro tip: if you're in a hurry, place the dough in the freezer for 20 minutes instead. Just don't skip this step—I learned the hard way that warm dough leads to flat, sad cookies.
🔥 Step 5: Bake in Two Stages for Maximum Crunch
Preheat your oven to 350°F and line two baking sheets with parchment paper. Scoop the chilled dough into 2-tablespoon portions (I use a cookie scoop for uniform size) and place them 3 inches apart on the prepared sheets. Bake for 11-13 minutes until the edges are golden brown but the centers still look slightly underdone.
Here's where the magic happens: remove the cookies from the oven and immediately sprinkle each one with a pinch of flaky sea salt. Then, while still hot, sprinkle the 0.25 cup granulated sugar over the top. Return the baking sheet to the oven for 2-3 more minutes—this second bake creates that perfect caramelized crust and those beautiful sugar crystals.
Pro Tips For Making Best Tasting Chocolate Chip Cookie
- Use Cold Butter Cubes: I learned this the hard way—softened butter makes cookies spread into sad, flat pancakes. Cut your unsalted butter into ½-inch cubes and toss them in the fridge for 10 minutes before mixing. The dough stays thick and holds its shape, giving you that perfect chewy center.
- Mix Just Until Combined: Overworking the dough turns cookies into tough, dense bricks. Once the wet ingredients (eggs, sugars, vanilla) and dry ingredients (flour, salt) come together, stop. Stir in the chocolate chips, then fold once to distribute them evenly. Your cookies will stay tender, not chewy-turned-rubbery.
- Skip Measuring Brown Sugar: Pack your brown sugar hard—no air gaps. I used to scoop it straight from the bag, and my cookies always tasted under-sweet. Press it into the measuring cup, then level it off. The extra moisture from packed sugar makes the cookies crisp at the edges and soft inside.
- Bake Until Golden, Not Brown: Pull the cookies when the edges are just starting to turn golden, not when they’re deep brown. I used to wait too long, and the centers turned dry. A toothpick should come out with a few moist crumbs, not wet dough. They’ll keep baking on the tray for another minute—trust the timer, not your eyes.
Pro cooking tips for this dish
Butter Consistency
Use cold, cubed butter straight from the fridge—never softened or melted. I cut my Land O'Lakes unsalted butter into ½-inch cubes and let them sit at room temperature for just 10-15 minutes before mixing.
This ensures proper emulsification with the sugars while preventing excessive spreading. If your butter starts to melt too quickly during mixing, switch to low speed immediately to avoid a greasy mess. 🧈
Sugar Ratio Secrets
The 75/75 split between white and brown sugar is non-negotiable for that signature texture. The white sugar creates crispy edges through caramelization, while the brown sugar adds moisture for chewy centers. I always pack my brown sugar firmly into the measuring cup—no scooping—to ensure accurate moisture levels.
For extra depth, I replace 2 tablespoons of white sugar with turbinado sugar before baking for a subtle crunch.
Dough Resting Rules
Never skip the 30-minute chill, but don't overdo it—24 hours max in the fridge. The dough should be firm but pliable when you scoop. I press my dough against the bowl to test: if it springs back slowly, it's ready.
For make-ahead baking, I portion the dough into balls, flatten slightly, wrap in plastic, and freeze for up to 3 months. Bake straight from frozen, adding 2-3 extra minutes to the total time.
Baking Precision
Your oven's hot spots are the enemy of perfect cookies. Rotate baking sheets halfway through the 11-13 minute bake for even golden edges. Use an oven thermometer—most home ovens run 25°F hotter than set.
The cookies should pull away slightly from the parchment but still look soft in the center when you remove them for the first bake. This underbaking ensures maximum gooeyness while allowing the second bake to create that crispy exterior.
Chocolate Chip Placement
Don't just dump the chips in—press some dough into the bag first. This creates pockets of melted chocolate that become rivers when baked. I use a mix of Nestlé semi-sweet and Enjoy Life allergy-friendly chips for variety.
For professional results, chill the chocolate chips for 10 minutes before folding—they'll stay firmer longer during baking. If you love texture, replace ½ cup chips with chopped dark chocolate (70% cocoa) for a sophisticated twist.
Post-Bake Finishing
The flaky sea salt and granulated sugar sprinkle must happen immediately after the first bake while cookies are piping hot. I use Maldon sea salt for its delicate crystals that dissolve on the tongue. For extra crunch, I add 1 teaspoon toasted sesame seeds to the sugar mix.
Let cookies cool on the baking sheet for 5 minutes before transferring—they'll firm up just enough to handle but still be warm inside. 💛
Nutrition facts
Frequently asked questions about perfect chocolate chip cookies
Why do your cookies taste better than store-bought?
The secret lies in the double-bake technique and precise ingredient ratios. Using both white and brown sugar creates crispy edges with chewy centers, while the 30-minute dough rest ensures even baking. Fresh, high-quality butter and pure vanilla extract make all the difference too. Plus, the flaky sea salt and sugar sprinkle add that bakery-style finish!
Can I make these cookies without butter?
Yes! For a dairy-free version, substitute the butter with 1 cup vegetable shortening or 1 cup coconut oil (solid). The texture will be slightly different—less flavorful but still delicious. If using coconut oil, make sure it's completely solid before mixing. For a healthier option, try 1 cup Greek yogurt or 1 cup applesauce (reduce other liquids by 2 tablespoons).
How do I get the chocolate chips to stay melty?
Chill your chocolate chips for 10 minutes before folding them in—they'll stay firmer longer during baking. Also, use a mix of semi-sweet and dark chocolate (70% cocoa) for better melting behavior. Most importantly, don't overbake! Remove cookies when edges are golden but centers still look soft. The second bake creates crispy edges while keeping chocolate gooey inside.
What if my cookies spread too much?
Over-spreading usually means your dough was too warm or your butter melted during mixing. Always chill dough for at least 30 minutes and use cold, cubed butter (not softened). If your cookies still spread too much, try baking at 325°F instead of 350°F and reduce baking time by 1-2 minutes. For thicker cookies, scoop 1.5 tablespoons of dough instead of 2 tablespoons.
Can I make these cookies gluten-free?
Replace the all-purpose flour with a 1:1 gluten-free baking flour blend (like Bob's Red Mill or King Arthur). For best results, add 1 teaspoon xanthan gum to the dry ingredients. Also, reduce the baking soda to ½ teaspoon—gluten-free cookies can rise too quickly. Chill the dough longer (1 hour) to prevent excessive spreading, and expect slightly denser (but still delicious!) results.