
Desserts
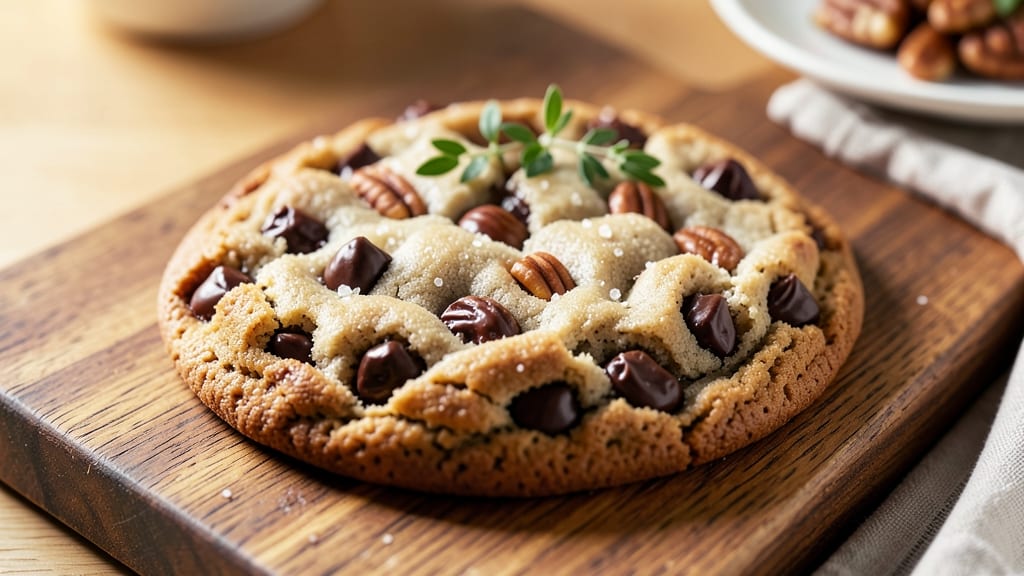
This big chocolate chunk cookie recipe delivers the ultimate dessert experience—thick, chewy centers with crisp edges and rivers of molten chocolate in every bite. 🔥 The secret lies in using a mix of semi-sweet and dark chocolate chunks that melt into luscious pools during baking, while a touch of corn syrup ensures that signature soft texture.
I've baked these for holidays, potlucks, and midnight cravings, and they never disappoint.
The recipe starts with a robust dough that balances brown sugar for caramel depth with white sugar for chewiness, all mixed with butter at room temperature for even distribution.
What sets these apart is the two-stage baking process: an initial lower temperature to set the edges, followed by a higher heat to create those signature chocolate rivers. This method guarantees cookies that are perfectly baked through but still soft in the center.
By the time you pull them from the oven, you'll have cookies that look like they belong in a bakery display—thick, golden, and crackling at the edges with visible chocolate chunks peeking through.
The aroma alone will have everyone gathering around your kitchen, and the first bite delivers that perfect combination of buttery richness, chocolatey intensity, and a satisfying crunch.
These cookies stay fresh for up to a week in an airtight container, though I can't guarantee they'll last that long. For extra indulgence, add a handful of toasted walnuts or pecans, or swap in milk chocolate for a sweeter variation. Here's how to make them perfectly every time.
Ingredients for big chocolate chunk cookie
Buttery richness meets molten chocolate rivers—here's what makes these cookies extraordinary.
| Ingredient | Amount | Notes |
|---|---|---|
| Unsalted Butter 🧈 | 1 cup | Room temperature for even mixing |
| Light Brown Sugar 🍚 | 1 cup | Packed, not scooped |
| Granulated White Sugar 🍚 | ½ cup | For chewy texture |
| Corn Syrup 🍯 | ¼ cup | For soft, chewy centers |
| Large Eggs 🥚 | 2 whole | Room temperature |
| Vanilla Extract 🌿 | 2 tsp | Pure, not imitation |
| All-Purpose Flour 🌾 | 2 ½ cups | Sifted, spooned not scooped |
| Baking Soda 🧂 | ½ tsp | For lift and crisp edges |
| Diamond Crystal Kosher Salt 🧂 | ½ tsp | Fine grain preferred |
| Semi-Sweet Chocolate Chunks 🍫 | 1 ½ cups | 60-70% cacao, chopped |
| Dark Chocolate Chunks 🍫 | 1 cup | 70-85% cacao, chopped |
| Toasted Walnuts 🌰 | ½ cup | Optional for crunch |
The chocolate chunks are non-negotiable—Ghirardelli 60% semi-sweet and Valrhona 70% dark are my go-tos, but Ghirardelli baking chips from any grocery store work in a pinch. Chop your own for better texture, or grab pre-chopped if you're short on time. The butter needs to be room temperature—press it gently, and if it leaves an indentation, you're good. For brown sugar, pack it tightly into the measuring cup. The corn syrup might seem odd, but it's what creates that signature chewy center. Logan's brand is my favorite, but any pure corn syrup will do.
No corn syrup? Maple syrup at half the amount works, though the texture will be slightly less chewy. Short on dark chocolate? Milk chocolate chunks add sweetness but lose that deep cocoa punch. The walnuts are optional, but if you add them, toast them first—toss with a pinch of salt and 350°F oven for 8-10 minutes. For flour, King Arthur or Gold Medal are my top picks, but any all-purpose will work. The baking soda is crucial—it's what gives these cookies that perfect crisp edge while keeping the center soft. If you're using a different brand of salt, reduce to 0.25 tsp since Diamond Crystal is less salty than table salt.
Store the dough in the fridge for up to 48 hours—it actually improves in flavor. Once baked, keep cookies in an airtight container with parchment between layers for 1 week. For longer storage, freeze dough balls for 3 months—bake straight from frozen, adding 2-3 minutes to the time. The chocolate rivers are best enjoyed at room temperature, so let them cool completely before serving. These reheat beautifully—30 seconds in the microwave makes them warm and gooey again.
Why You'll Love This Recipe
- No Mixer Needed: I swear by this—just cream the butter and sugars by hand (or with a fork, if you're feeling lazy). That corn syrup keeps everything silky without needing extra steps, and the eggs bind it all together like magic. Five minutes of prep, zero fuss.
- Chocolate Overload (But Not Heavy): Between us, these aren’t your average cookies. The chunks melt into gooey pockets while the edges stay just crisp enough—thanks to that brown sugar caramelizing. Honestly, I’ve seen people skip the chips and still beg for seconds. (Don’t let them.)
- Freezer-Friendly Forever: Bake a batch on Sunday, freeze half, and thank me later. They stay soft enough to slice straight from the bag—no waiting for the oven. My kids’ school lunches? Now with 100% less sad face.
- Budget Luxury: You’re using pantry staples here: butter, sugar, eggs. The chocolate? Whatever’s on sale. Yet somehow, it tastes like you spent hours (or a fortune) making it. That’s the secret—simple ingredients, maximum indulgence.
Step-by-step instructions for triple-layered chocolate chunk cookies
These cookies deliver restaurant-quality texture with gooey centers and crispy edges.
👨🍳 Step 1: Cream Butter and Sugars Until Light and Fluffy
In a stand mixer fitted with the paddle attachment, combine the 1 cup unsalted butter (room temperature), 1 cup light brown sugar, and 0.5 cup granulated white sugar. Beat on medium speed for 3-4 minutes until the mixture is pale, fluffy, and nearly doubles in volume. You'll see ribbons form when you lift the paddle—this is your signal the butter is properly aerated.
I press down on the paddle occasionally to ensure the butter incorporates fully. If the mixture looks grainy, that means your butter wasn't soft enough—let it sit at room temperature for another 10 minutes before continuing. The corn syrup will come in next, but first, we need this perfect creamy base.
👨🍳 Step 2: Incorporate Wet Ingredients for Maximum Chew
Add the 0.25 cup corn syrup and mix for 30 seconds to combine completely. Then add the 2 whole large eggs (room temperature) one at a time, mixing on low speed for 30 seconds after each addition. Finally, stir in the 2 teaspoons vanilla extract and mix for another 10 seconds until just combined.
Here's the thing—corn syrup and eggs at room temperature create that signature chewy texture. If your eggs are cold, the dough will be tough. I like to place them in warm water for 5 minutes before using if they're straight from the fridge. The mixture should now be smooth with no visible flour streaks yet.
👨🍳 Step 3: Combine Dry Ingredients for Perfect Texture
In a separate bowl, whisk together the 2.5 cups all-purpose flour, 0.5 teaspoon baking soda, and 0.5 teaspoon diamond crystal kosher salt. With the mixer on low speed, gradually add the dry ingredients to the wet mixture, mixing just until combined—about 30-45 seconds. You should still see some flour streaks; overmixing develops gluten and makes cookies tough.
Remove the bowl from the mixer and gently fold in the 1.5 cups semi-sweet chocolate chunks, 1 cup dark chocolate chunks, and 0.5 cup toasted walnuts using a silicone spatula. I like to distribute the chocolate evenly throughout the dough so every bite has that perfect crunch and melt. Don't worry if it looks under-mixed—we're going to chill it next.
⏰ Step 4: Chill the Dough for Perfect Shape and Texture
Cover the bowl with plastic wrap and refrigerate for at least 1 hour (I prefer 2 hours or even overnight). Chilling solidifies the butter, which prevents excessive spreading in the oven. It also allows the flour to fully hydrate, creating that ideal chewy texture we're after.
Real talk: Skipping this step leads to flat, cakey cookies. The cold dough also makes handling easier—you won't get that frustrating dough sticking to your hands when scooping. Take this time to preheat your oven to 375°F and line two baking sheets with parchment paper.
🔥 Step 5: Bake to Golden Perfection with Chocolate Rivers
Scoop the chilled dough into 2-tablespoon portions (about 2 ounces each) and place them 3 inches apart on the prepared baking sheets. Bake for 11-13 minutes until the edges are golden brown but the centers still look slightly underdone. They'll continue cooking on the hot pan after removal.
Here's where the magic happens: As soon as you remove them from the oven, watch as the chocolate begins to melt and create those beautiful rivers. Let them cool on the baking sheet for 5 minutes before transferring to a wire rack. The cookies will firm up slightly as they cool but maintain that perfect chewy center.
Pro Tips For Making Big Chocolate Chunk Cookie
- CREAM BUTTER SLOWLY: I learned this the hard way—dumping cold butter into the wet ingredients makes a greasy mess. Instead, cut the butter into small cubes and let it sit at room temp for 30 minutes before mixing. That way, it blends smoothly without turning your dough into a science experiment.
- WEIGH THE SUGARS: Brown sugar clumps like a grumpy teenager, and measuring by volume is a gamble. Use a kitchen scale for both sugars—pack the brown sugar firmly into the cup, then level it off. That extra gram of moisture makes a real difference in chewiness.
- UNDERBAKE THE CENTERS: These cookies are supposed to be soft inside, not raw. Pull them when edges are set but centers still jiggle slightly—they’ll firm up as they cool. Overbaking turns them into hockey pucks, and nobody wants that.
- CHILL DOUGH TWICE: Divide the dough into balls, chill for 24 hours, then bake. The first chill prevents spreading; the second rest (even just 30 minutes) keeps them from cracking when the chocolate melts. Sounds weird, but it works—your cookies will thank you.
Storing and reheating this recipe
Room Temperature Storage
Keep your freshly baked cookies at room temperature in an airtight container with parchment paper between layers for up to 3 days. The chocolate rivers stay gooey when stored this way, but I recommend eating them within 2 days for peak texture.
Place the container in a cool, dark spot—like a pantry—to preserve freshness. 🍪
Refrigerator Storage
For longer freshness, store cookies in the fridge for up to 1 week. Use the same airtight container with parchment paper to prevent sogginess. The cold temperature actually enhances the chocolate's flavor, but the cookies may firm up slightly.
Let them sit at room temperature for 5-10 minutes before serving to restore that perfect chewy bite.
Freezing Dough Balls
Freeze uncooked dough balls for up to 3 months for maximum convenience. Scoop 2-tablespoon portions, roll them into balls, and place on a parchment-lined tray. Freeze solid, then transfer to a ziplock freezer bag with parchment between layers.
Bake straight from frozen, adding 2-3 extra minutes to the 11-13 minute time—no thawing needed! 🧊
Freezing Baked Cookies
Baked cookies freeze beautifully for up to 2 months. Cool completely, then wrap individually in plastic wrap before placing in a freezer bag. To reheat, microwave for 10-15 seconds or warm in a 350°F oven for 3-4 minutes until gooey again.
The texture remains chewy, though the chocolate rivers may be slightly less pronounced after freezing.
Reheating for Maximum Gooeyness
For the best results, reheat cookies in the oven. Place them on a baking sheet and warm at 350°F for 3-4 minutes—just until the edges soften and the chocolate begins to melt again.
Microwave reheating works in a pinch (10-15 seconds), but it can make the cookies slightly rubbery. Always reheat from room temperature for even warming. ✨
Preserving Chocolate Rivers
To maintain those signature chocolate rivers, avoid storing cookies in humid environments. If your kitchen feels damp, place a small silica gel packet in the storage container. For extra indulgence, serve cookies slightly warm—the chocolate flows more dramatically when the cookies are at room temperature.
A quick 10-second microwave zap before serving brings back that bakery-fresh appeal. 💫
Nutrition facts
Frequently asked questions
Why does this recipe use both semi-sweet and dark chocolate?
The combination creates a perfect balance of sweetness and depth. The semi-sweet chunks add rich caramel notes while the dark chocolate (70-85% cacao) provides that intense cocoa flavor that melts into luscious rivers. Using both types ensures every bite has that signature chocolatey complexity without being overly sweet.
Can I make these cookies without corn syrup?
Yes! Replace the 0.25 cup corn syrup with 0.125 cup maple syrup or 0.25 cup honey, but expect slightly less chewiness. The syrup is what creates that signature soft center—if you omit it entirely, your cookies will be more cake-like. For a neutral substitute, use 0.25 cup granulated sugar instead.
How do I prevent my cookies from spreading too much?
Chilling the dough for at least 2 hours (or overnight) is key—this firms up the butter and prevents excessive spreading. Also, scoop 2-tablespoon portions (about 2 ounces) and place them 3 inches apart on the baking sheet. For extra insurance, flatten each dough ball slightly before baking.
Can I add other mix-ins besides walnuts?
Try pecans, almonds, or even dried cranberries for a festive twist. For crunch, toast your nuts first (350°F for 8-10 minutes with a pinch of salt). If adding fruits like cherries or blueberries, fold them in gently—they'll soften during baking. Just don't exceed 0.5 cup total of mix-ins to maintain the cookie's texture.
Why do my chocolate rivers disappear after baking?
This usually happens if the oven isn't hot enough or the cookies bake too long. Aim for 375°F and pull them when edges are golden but centers still look slightly soft—they'll firm up as they cool. For extra dramatic rivers, place cookies on a preheated baking sheet right after removing from the oven.