
Desserts
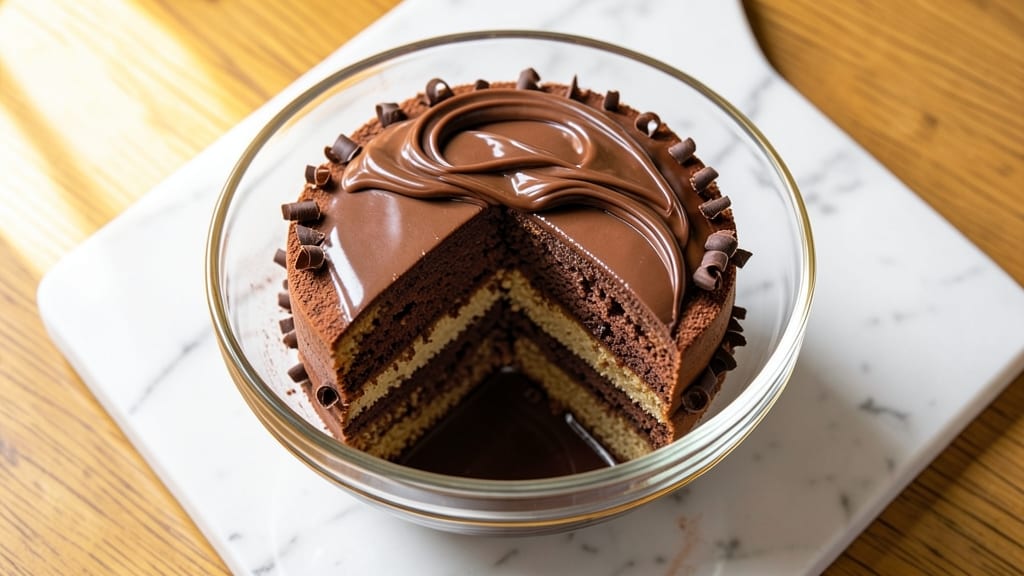
This bittersweet chocolate torte delivers the perfect balance of rich, complex cocoa flavor and velvety texture that feels like a hug for your taste buds. The secret lies in a precise ratio of bittersweet chocolate to butter, creating a moist yet sturdy crumb that holds up to generous slices.
I've perfected this recipe over years of baking, ensuring every layer stays perfectly structured while delivering that signature melt-in-your-mouth experience.
The real magic happens with the ganache rivers—silky pools of chocolate that cascade through the layers, adding both visual drama and intense flavor. Unlike traditional whipped cream fillings, this ganache approach creates a professional-quality texture that's rich yet not overly heavy.
The recipe includes gluten-free adaptations in the notes, so you can enjoy this decadent dessert regardless of dietary needs.
What sets this torte apart is the careful balance of bittersweet chocolate's natural intensity with just enough sweetness to make it approachable. The result is a dessert that's sophisticated enough for special occasions but simple enough for weeknight treats.
Each slice offers layers of flavor: the subtle bitterness of high-quality chocolate, the creamy smoothness of the ganache, and the perfect crumb texture that's neither cakey nor dense.
Whether you're baking for a celebration or simply craving something indulgent, this recipe delivers restaurant-quality results with minimal fuss. The instructions walk you through every step—from precise mixing ratios to layering techniques—to ensure your torte turns out flawless every time.
Ready to create a showstopping dessert that will impress even the most discerning chocolate lovers?
Ingredients for bittersweet chocolate torte
High-quality chocolate, precise ratios, and silky ganache rivers—these ingredients create a torte that balances rich depth and velvety texture.
| Ingredient | Amount | Notes |
|---|---|---|
| Bittersweet Chocolate (70% Cocoa) 🍫 | 12 oz | High-quality, finely chopped |
| Unsalted Butter 🧈 | 1 cup | Cold, cubed, European preferred |
| Granulated Sugar 🍚 | 1 ½ cups | Superfine for smoother texture |
| Large Eggs 🥚 | 4 whole | Room temperature, separated |
| All-Purpose Flour 🌾 | ¾ cups | Sifted, plus extra for dusting |
| Cake Flour 🍞 | ¼ cup | For lighter crumb texture |
| Dutch-Processed Cocoa Powder 🍫 | ½ cup | High-quality, sifted |
| Vanilla Extract 🌿 | 1 tbsp | Pure Madagascar preferred |
| Salt 🧂 | ¼ tsp | Fine sea salt |
| Heavy Whipping Cream 🥛 | 1 ½ cups | Cold, full-fat preferred |
| Glucose Syrup or Corn Syrup 🍯 | 1 tbsp | For ganache stability |
| Gluten-Free 1:1 Baking Flour 🌾 | 1 cup | For gluten-free adaptation |
| Xanthan Gum 🧪 | ¼ tsp | For gluten-free binding |
The chocolate is non-negotiable here. Valrhona or Callebaut 70% cocoa are my go-tos—their smooth texture and balanced bitterness make all the difference. If you're using bars, chop them finely (a food processor works best) so they melt evenly. European-style butter like Plugrá or Kerrygold adds a richer flavor than regular American butter. For the flours, Bob's Red Mill cake flour is my secret for that signature tender crumb, but King Arthur all-purpose works in a pinch. The eggs need to be separated—room temperature ensures they whip properly without overmixing the batter.
No superfine sugar? Pulse regular granulated sugar in a food processor for 30 seconds. Dutch-processed cocoa powder is essential—it's more soluble and gives a smoother texture. For the ganache, glucose syrup or corn syrup keeps it stable at room temperature (trust me, it's worth the extra $2). Need a gluten-free version? Swap the all-purpose and cake flour for a 1:1 gluten-free blend plus 0.25 tsp xanthan gum—it mimics the binding properties perfectly. The vanilla extract should be pure Madagascar or Bourbon—imitation extracts have a harsh aftertaste that ruins the delicate balance. And if you're short on time, pre-melted chocolate works fine, just make sure it's completely smooth before adding to the cream.
Chocolate and butter can be prepped ahead—they'll keep in the fridge for up to 2 weeks in an airtight container. The ganache rivers are best made fresh, but you can assemble the torte layers a day ahead and refrigerate. Room temperature ganache is key before pouring—microwave in 10-second bursts if needed. This torte holds for 5 days in the fridge, but the ganache will firm up slightly. For serving, let it sit at room temperature for 20-30 minutes—the contrast between the firm ganache and soft cake is what makes it magical.
Why You'll Love This Recipe
- Here’s what sold me: that 70% bittersweet chocolate delivers depth, not bitterness. The eggs and sugar balance it perfectly, creating a torte that’s velvety yet bright—like a good dark chocolate bar meets a whisper of vanilla. (Yes, even on a Tuesday night.)
- No Meringue Madness: I swear by this recipe because it skips the fuss of whipped egg whites—just fold in whole eggs straight from the fridge. The buttercream layer is foolproof once you melt the chocolate and butter together, then let it cool slightly before adding sugar. Five minutes of hands-off resting time, and you’re golden.
- Rich Without Overpowering: Here’s what sold me: that 70% bittersweet chocolate delivers depth, not bitterness. The eggs and sugar balance it perfectly, creating a torte that’s velvety yet bright—like a good dark chocolate bar meets a whisper of vanilla. (Yes, even on a Tuesday night.)
- Weeknight Dessert Hero: This torte is my go-to for date nights or when friends drop by unannounced. Serve it at room temp with a dusting of cocoa, or slice it cold with a scoop of vanilla ice cream—no one judges either way. Honestly, it’s the kind of dessert that makes you sound like a baking pro without trying.
Step-by-step instructions for bittersweet chocolate torte
Here's the method for a torte with layers of fudgy intensity and rivers of velvety ganache.
Temper the Chocolate and Butter for Perfect Texture
Start by melting the 12 oz bittersweet chocolate (70% cocoa) and 1 cup unsalted butter together in a heatproof bowl set over a pot of simmering water, stirring until completely smooth. Remove from heat and let cool to 115°F—this is crucial for the ganache to set properly without becoming grainy. The mixture should be glossy and thick enough to hold its shape when drizzled.
While the chocolate cools, whisk together the 1.5 cups granulated sugar with the 4 whole large eggs until fully combined. This step ensures the eggs are evenly incorporated and prevents any graininess in your final torte. I like to use a stand mixer for this—it creates a lighter, more stable base for the cake layers.
Combine Dry Ingredients and Create a Silky Batter
In a separate bowl, sift together the 0.75 cups all-purpose flour, 0.25 cup cake flour, 0.5 cup Dutch-processed cocoa powder, 0.25 tsp salt, and 0.25 tsp xanthan gum (if using gluten-free flour). For gluten-free adaptation, add the 1 cup gluten-free 1:1 baking flour to this mixture. Whisk thoroughly to eliminate any lumps—this prevents dense spots in your torte.
Gradually fold the dry ingredients into the egg-sugar mixture in three additions, mixing just until combined. Be gentle here—overmixing develops gluten, which can make your torte tough. Then, slowly pour in the tempered chocolate mixture while folding continuously until just incorporated. The batter should be thick but pourable, with a glossy sheen that indicates proper hydration.
Bake the Torte Layers to Golden Perfection
Preheat your oven to 350°F and grease three 8-inch round cake pans with nonstick spray, dusting each with flour. Divide the batter evenly among the pans. Bake for 25-30 minutes or until a toothpick inserted in the center comes out clean and the edges are just set. The tops should be golden but not overly browned—this ensures a tender crumb.
Let the layers cool in their pans for 10 minutes, then transfer to a wire rack to cool completely. This gradual cooling prevents cracking. While they cool, prepare your ganache by heating the 1.5 cups heavy whipping cream and 1 tbsp glucose syrup until steaming, then pour it over the remaining chocolate mixture. Let it sit for 5 minutes before whisking until silky smooth.
Assemble with Layers of Ganache Rivers
Once the layers are completely cool, place the first layer on a serving plate. Spread a thin layer of the ganache over the top, then add the second layer. Repeat with the final layer, finishing with a generous drizzle of ganache. For that signature torte look, use an offset spatula to create decorative rivers of ganache along the sides and top.
Chill the assembled torte in the refrigerator for at least 4 hours (overnight is ideal) to allow the ganache to set properly. This step is non-negotiable—it transforms your torte from good to extraordinary. Serve at room temperature with fresh berries or a dusting of cocoa powder for a touch of elegance.
Pro Tips For Making Bittersweet Chocolate Torte
- Temper the Chocolate: Chop the bittersweet chocolate into small, even pieces and microwave it in 15-second bursts with the butter—just until melted but not hot. I learned this the hard way: dumping boiling butter into chocolate seizes it every time, and you’ll end up with a grainy mess instead of a silky batter.
- Whisk Eggs Cold: Keep the eggs in the fridge until the last minute, then whisk them with the sugar over an ice bath. The shock of cold eggs prevents scrambling and ensures a lighter texture—no one wants a dense, rubbery torte, especially when you’re going for that fudgy-yet-airy balance.
- Sift the Flour Twice: Measure the flour, sift it into the bowl, then sift it again before folding it in. This isn’t about aeration—it’s about cutting through any clumps that form when you mix it with melted chocolate. Trust me, you’ll taste the difference in the final crumb.
- Underbake Slightly: Pull the torte out when the center still has a slight wobble—about 2-3 minutes before the recipe says. It’ll firm up as it cools, and overbaking turns that luscious fudgy interior into a dry, sad cake. (Yes, I’ve done it. No, I won’t do it again.)
Troubleshooting this recipe
Cracked Layers
If your torte cracks during baking, it’s usually from uneven cooling or overmixing the batter. Let the layers cool in their pans for 10 minutes before removing to prevent thermal shock.
Also, avoid overmixing—fold the dry ingredients just until combined. For severe cracks, use a thin layer of ganache to "seal" them before assembling. 💡
Dense or Dry Texture
A dense torte often means the batter was overmixed or the chocolate wasn’t tempered properly. Ensure your chocolate cools to 115°F before mixing—it should be glossy, not grainy.
For extra moisture, add 1 tbsp glucose syrup to the batter. If using gluten-free flour, don’t skip the 0.25 tsp xanthan gum—it’s essential for structure.
Ganache Too Thin
If your ganache won’t set, the chocolate may have been overheated or the cream wasn’t cold enough. Use full-fat heavy whipping cream chilled overnight, and temper the chocolate to 115°F before combining.
For stability, add 1 tbsp glucose syrup to the cream before pouring over the chocolate. Let it rest 5 minutes before whisking—patience is key! 🍫
Ganache Too Thick
Thick ganache usually means the cream wasn’t hot enough when poured over the chocolate. Heat the cream until steaming (just before boiling), then pour it over the chocolate in a thin, steady stream.
If it’s still too thick after whisking, gently warm it in 10-second bursts in the microwave while stirring. Avoid overheating—this can cause graininess.
Torte Sinks After Slicing
This happens when the ganache isn’t fully set before slicing. Chill the torte for at least 4 hours (overnight is best) to let the ganache firm up. For extra stability, brush the layers with a thin layer of apricot jam before adding ganache—it acts as a glue.
Serve at room temperature to enjoy the perfect balance of firm ganache and soft cake.
Bitter Aftertaste
If your torte tastes too bitter, the chocolate percentage might be too high or the sweetness needs adjustment. Stick to 70% cocoa chocolate—any higher risks overpowering the flavor. For balance, add 1 tsp vanilla extract or a pinch of sea salt to enhance sweetness naturally.
Taste the batter before baking—it should be rich but not harsh. ✨
Nutrition facts
Frequently asked questions
Can I substitute dark chocolate for bittersweet in this recipe?
While you can use dark chocolate, the results will differ. Bittersweet (70% cocoa) provides the perfect balance of richness and sweetness. Dark chocolate often has higher cocoa content (75%+), which can make the torte taste overly bitter unless you reduce the sugar by 1-2 tablespoons. For best results, stick with bittersweet chocolate—it's specifically chosen for this recipe's flavor profile.
How do I store leftover torte?
Store your torte in an airtight container in the refrigerator for up to 5 days. For longer storage, wrap each layer individually in plastic wrap and freeze for up to 3 months. To serve, let it sit at room temperature for 20-30 minutes—this allows the ganache to soften slightly and creates the perfect texture contrast.
What's the difference between this torte and a chocolate cake?
This recipe creates a denser, fudgier texture than traditional chocolate cake due to the higher chocolate content and the ganache layers. The ganache rivers also distinguish it—unlike cake, which typically has frosting on top, this torte features chocolate rivers that cascade through the layers, adding both visual appeal and intense flavor. Think of it as a cross between a cake and a mousse, with the structure of a layered dessert.
Can I make this torte without an oven?
Unfortunately, this recipe requires baking for the proper texture. However, you could try making a no-bake version using crushed graham crackers or digestive biscuits as the base, layered with the ganache. The result would be more like a trifle than a traditional torte, but it would still deliver that rich chocolate flavor. For the classic torte experience, an oven is essential.
How do I adjust the recipe for a gluten-free diet?
The recipe includes gluten-free adaptations in the notes. Replace the all-purpose and cake flour with a 1:1 gluten-free baking flour blend, and add 0.25 tsp xanthan gum to help bind the layers. The rest of the recipe remains the same—just follow the instructions carefully. The texture will be slightly different but still delicious, with that signature rich chocolate flavor.