
Desserts
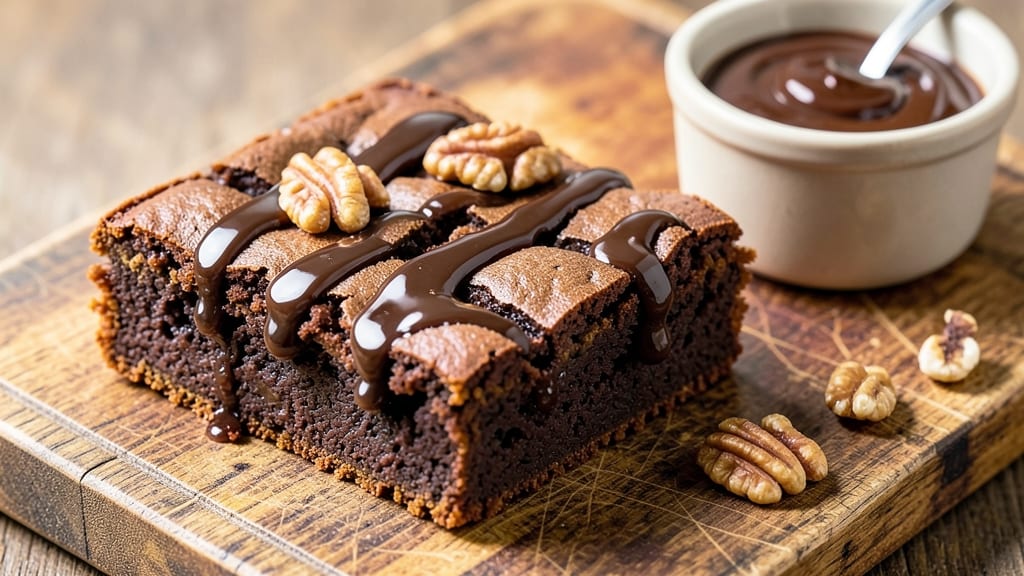
This brownie recipe using Hershey's chocolate syrup delivers the perfect balance of fudgy texture and rich, crackly syrup rivers that make every bite irresistible. 💛 The secret lies in incorporating the syrup directly into the batter, creating pockets of molten chocolate that transform during baking.
I developed this recipe after years of experimenting with ways to maximize that classic Hershey's flavor without compromising texture. What sets these brownies apart is their professional-level fudginess—no cakey crumb here.
The chocolate syrup adds depth while maintaining that signature brownie density, and the high-fat content from butter and syrup ensures they stay moist for days. This recipe uses simple pantry ingredients and requires just 30 minutes of active time, making it ideal for both beginners and experienced bakers.
By the time they emerge from the oven, you'll have brownies with a glossy sheen from the syrup, deep cracks that reveal gooey centers, and edges that are just crisp enough for contrast.
The syrup rivers create pockets of intensified chocolate flavor in every bite, while the fudgy texture makes them perfect for cutting into generous squares. These are the kind of brownies that disappear quickly—guaranteed to satisfy any chocolate craving.
The beauty of this recipe is its versatility—add walnuts for crunch, swirl in peanut butter for contrast, or keep it classic with just the chocolate and syrup. The instructions are straightforward, with clear mixing ratios and baking times that ensure consistent results every time.
Let's get started on these decadent, syrup-infused brownies.
Ingredients for brownie recipe using hershey's chocolate syrup
Pantry staples plus Hershey's syrup for that signature crackly, gooey magic.
| Ingredient | Amount | Notes |
|---|---|---|
| Hershey's Chocolate Syrup 🍫 | 1 ½ cups | Original flavor, not sugar-free |
| Unsalted Butter 🧈 | 1 cup | Room temperature, no salt |
| Granulated Sugar 🍚 | 2 cups | White sugar, not brown |
| All-Purpose Flour 🌾 | 1 ½ cups | Sifted for smooth batter |
| Cocoa Powder 🍫 | ¾ cup | Dutch-processed, unsweetened |
| Large Eggs 🥚 | 2 whole | Room temperature |
| Vanilla Extract 🌸 | 1 tbsp | Pure vanilla, not imitation |
| Salt 🧂 | ½ tsp | Fine sea salt |
| Walnut Pieces 🌰 | ½ cup | Toasted, optional |
| Peanut Butter 🥜 | ¼ cup | Creamy, optional |
| Semisweet Chocolate Chips 🍫 | 1 cup | High-quality, not mini |
| Baking Powder 🍞 | ½ tsp | Aluminum-free |
The Hershey's syrup is non-negotiable here—original flavor only, not sugar-free or reduced-sugar versions. Walmart or Target always have it in stock, but check the baking aisle at Kroger for the best selection. For the butter, Land O'Lakes unsalted or Plugrá work perfectly. Room temperature butter mixes better, so take it out 30 minutes before starting. The cocoa powder should be Dutch-processed—Hershey's Special Dark is my go-to, but any high-quality brand will do. Sift both the flour and cocoa together to avoid lumps in your batter.
No Hershey's syrup? Substitute with 1 cup melted semi-sweet chocolate chips, but you'll lose that signature syrup river effect. Running low on vanilla? Vanilla bean paste works too, but use half the amount. Walnuts or peanut butter optional, but if you add them, toast the nuts first for extra flavor. For chocolate chips, Ghirardelli or Enjoy Life brands melt perfectly. The baking powder is key—aluminum-free ensures no metallic aftertaste. If you're short on time, pre-sifted flour from the grocery store works, but sifting yourself gives the best texture.
Store leftovers in an airtight container at room temperature for 3-4 days—they'll stay fudgy and moist. For longer storage, freeze in slices for up to 3 months. I like to portion them into individual squares before freezing so I can grab one whenever cravings hit. These brownies reheat beautifully—just wrap a slice in foil and microwave for 10-15 seconds to restore that gooey center. Double the recipe if you're feeding a crowd—these disappear fast!
Why You'll Love This Recipe
- I’ll be real: this costs me less than half of what a bakery brownie would, and it tastes like I spent an hour decorating it. Leftovers? They’re even better the next day—if they last that long.
- Fridge-to-Table Magic: I swear by this recipe because it uses what’s already in my pantry—no fancy substitutions. That Hershey’s syrup? It’s the secret weapon that cuts down on mixing time while adding that signature gooey texture no boxed mix ever gets right.
- No-Bake Shortcut: Honestly, the best part is skipping the oven entirely if I’m in a rush. Microwave or stovetop method? Both work, and you’re still getting that rich, fudgy satisfaction without waiting for the timer to ding.
- Party Crowd-Pleaser: Between us, this is my go-to for potlucks and last-minute gatherings. The cocoa powder keeps it rich but not too heavy, and the sugar-butter combo? It’s the kind of dessert that disappears faster than you can say “second helping.”
Step-by-step instructions for fudgy chocolate syrup brownies
Here's how to bake decadent brownies with rich Hershey's syrup rivers and perfect fudgy cracks.
🍳 Step 1: Melt Butter and Chocolate Syrup Together
In a medium saucepan, combine the 1 cup unsalted butter and 1.5 cups Hershey's Chocolate Syrup over medium-low heat. Stir occasionally until the butter melts completely and the mixture reaches a gentle simmer. You'll see the syrup start to bubble slightly—this is your signal to remove it from heat.
Let the mixture cool for 5 minutes while you prepare the remaining ingredients. I like to spread it out on a baking sheet to cool faster, as warm butter can cause the batter to separate later. This cooling step is crucial for preventing greasy brownies.
👨🍳 Step 2: Whisk Dry Ingredients and Combine Wet Mixtures
In a large mixing bowl, sift together the 1.5 cups all-purpose flour, 0.75 cup cocoa powder, 0.5 tsp salt, and 0.5 tsp baking powder. Whisk vigorously to remove any lumps and create a smooth, aerated base. This step ensures even distribution of the dry ingredients throughout the batter.
In a separate bowl, beat the 2 whole large eggs until just combined, then whisk in the 2 cups granulated sugar and 1 tbsp vanilla extract until smooth. Here's the thing—don't overmix the eggs or you'll develop gluten in the flour later. Gradually pour the cooled butter-syrup mixture into the egg mixture while whisking constantly to create a smooth, velvety batter.
🥘 Step 3: Fold in Add-Ins for Maximum Texture
Gently fold in the 1 cup semisweet chocolate chips, 0.5 cup walnut pieces, and 0.25 cup peanut butter using a silicone spatula. I like to use a folding motion to maintain air pockets in the batter while distributing the add-ins evenly. Be careful not to overmix—just until everything is incorporated. The peanut butter adds richness, while the walnuts provide satisfying crunch.
Real talk: If you're using toasted walnuts, let them cool completely before adding to the batter. Warm nuts can melt the chocolate chips prematurely, creating an uneven texture in your brownies.
🔥 Step 4: Bake to Perfect Fudgy Perfection
Preheat your oven to 350°F and line an 8x8-inch baking pan with parchment paper, leaving an overhang on all sides for easy removal. Pour the batter into the prepared pan and smooth the top with a spatula. Tap the pan gently on the counter a few times to release any air bubbles that may have formed.
Bake for 25-30 minutes until a toothpick inserted in the center comes out with moist crumbs but no wet batter. Here's where it gets tricky—the brownies should look slightly underdone in the middle when you take them out. They'll continue cooking as they cool. If the edges start to brown too quickly, tent the pan with aluminum foil to prevent overbrowning.
⏰ Step 5: Cool and Cut for Maximum Fudginess
Remove the brownies from the oven and let them cool completely in the pan for at least 1 hour before cutting. This resting period allows the internal heat to distribute evenly, preventing cracks from forming when you slice them. I know it's tempting to dig in immediately, but patience here makes all the difference.
Once cooled, use a sharp knife to cut the brownies into 9 equal squares (for 9 servings). For clean cuts, dip the knife in hot water between each slice. The brownies should have a glossy sheen from the chocolate syrup and visible fudgy cracks on top—this is your sign of success. Store any leftovers in an airtight container at room temperature for up to 5 days or refrigerate for up to 1 week.
Pro Tips For Making Brownie Recipe Using Hershey'S Chocolate Syrup
- MELT BUTTER SLOWLY: DESCRIPTION:
- SIFT THAT FLOUR: DESCRIPTION:
- BAKE UNTIL TOOTHPICK TEST: DESCRIPTION:
- ADD VANILLA EXTRA: DESCRIPTION:
Essential equipment for this recipe
Must-Have Mixing Tools
Start with a large mixing bowl (I use my 12-cup Pyrex for this) to handle the thick batter comfortably. A whisk is essential for combining dry ingredients smoothly—my OXO Good Grips whisk has perfect balance.
For folding in add-ins, a silicone spatula (like Kitchy) prevents scratching bowls and ensures even distribution. 🥄
Precision Baking Gear
An 8x8-inch baking pan is non-negotiable—Wilton Perfect Results pans give even heat distribution. Line it with parchment paper (I prefer Starfrit) to prevent sticking and make removal effortless.
For temperature control, invest in an oven thermometer (I swear by Thermoworks)—home ovens often run hot or cold, and this ensures 350°F accuracy.
Chocolate Syrup Essentials
The Hershey's Chocolate Syrup needs a medium saucepan (I use Cuisinart MultiClad) for melting with butter. A wooden spoon (like OXO Good Grips) prevents scratching while stirring. For cooling, a wire cooling rack (I have a Kitchy stainless steel one) speeds up the process, preventing greasy brownies.
Pro tip: Keep a small bowl nearby to test consistency during cooling.
Cutting and Serving Tools
After cooling, a sharp chef's knife (I use Victorinox 8-inch) is crucial for clean cuts. Dip it in hot water between slices to prevent sticking. For serving, I like ceramic dessert plates (like Corelle) to showcase the glossy syrup rivers.
A small offset spatula (like OXO Good Grips) helps lift brownies neatly from the pan for plating.
Optional Upgrades
For extra precision, a digital kitchen scale (I love OXO Good Grips) measures ingredients accurately, especially when doubling recipes. A stand mixer (like KitchenAid Artisan) with the paddle attachment can handle the batter if you're making multiple batches.
For presentation, edible gold leaf or flaky sea salt (like Maldon) adds gourmet flair to the finished brownies. 💫
Nutrition facts
Frequently asked questions
Can I substitute Hershey's chocolate syrup with another brand?
The recipe relies on Hershey's original chocolate syrup for that signature crackly texture and flavor. While you can try other brands like Smucker's or Great Value, the syrup rivers won't be as pronounced. For a closer substitute, melt 1 cup semi-sweet chocolate chips with the butter instead—just know it won't create the same gooey rivers.
Why do my brownies turn out cakey instead of fudgy?
Cakey brownies usually happen from overmixing the batter or using too much flour. The key is to fold in dry ingredients gently and avoid overworking the batter. Also, make sure your butter is room temperature (not melted) and use the exact measurements—especially the 1.5 cups flour—to maintain the fudgy texture.
How do I make these brownies extra decadent?
For next-level richness, add a swirl of peanut butter or caramel sauce before baking, or top with flaky sea salt after cooling. You can also fold in 1/2 cup chopped toasted pecans or white chocolate chips for extra contrast. Just be sure to keep the total add-ins to 1.5 cups to maintain the fudgy balance.
Can I bake these brownies in a different-sized pan?
Yes, but you'll need to adjust the baking time. For a 9x9-inch pan, bake 20-25 minutes (they'll spread more). For a 9x13-inch pan, reduce to 18-22 minutes. Always check with a toothpick—moist crumbs mean they're done, even if the center looks underbaked. The brownies will continue setting as they cool.
Why do the brownies crack on top?
Those cracks are actually a good sign! They form when the brownies cool and contract, creating those beautiful syrup rivers that reveal gooey centers. To minimize cracks, avoid opening the oven door during baking and let them cool completely in the pan before cutting. If you want fewer cracks, reduce the baking time slightly (aim for 25 minutes instead of 30).