
Desserts
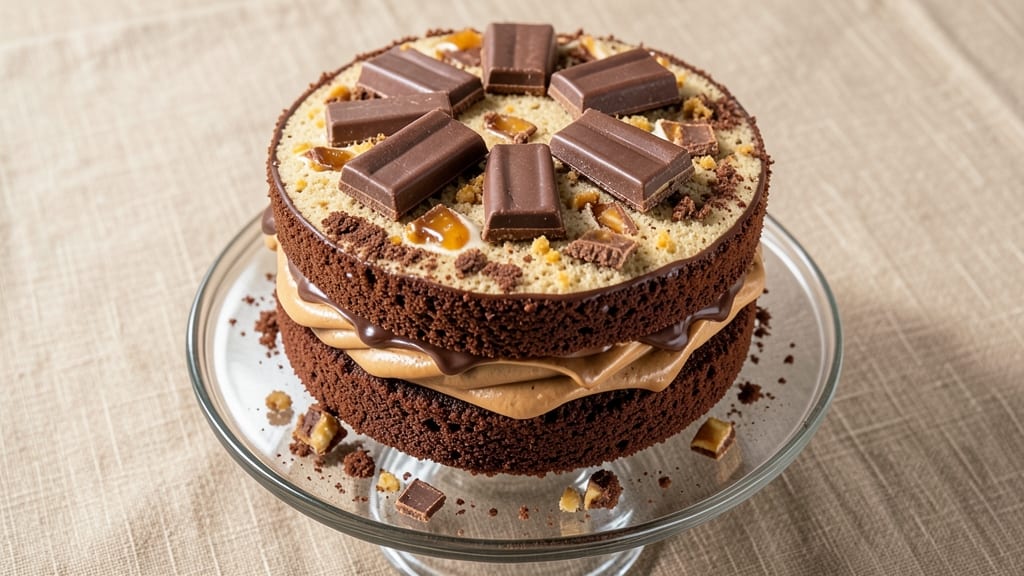
This Butterfinger cake recipe with chocolate cake combines two iconic flavors into one decadent dessert—rich chocolate cake layers swirled with creamy Butterfinger buttercream and crunchy peanut butter cups.
The secret lies in balancing the fudgy texture of the cake with the nutty, caramelized notes of crushed Butterfinger bars baked right into the batter.
I developed this recipe after years of experimenting with candy-infused desserts, and it’s now my go-to for birthdays, holidays, or anytime you crave something indulgent yet impressive.
The three-layer structure delivers maximum flavor impact: a moist chocolate cake base, a Butterfinger-infused middle layer for that signature peanut butter crunch, and a velvety Butterfinger buttercream frosting that ties everything together.
What makes this recipe stand out is the dual-flavor approach—the cake itself gets a boost from crushed Butterfinger bars, while the frosting incorporates Butterfinger buttercream for a cohesive, candy-forward experience. No artificial flavors or shortcuts here, just real ingredients that create a dessert worth celebrating.
By the time you slice into this cake, you’ll taste layers of chocolate richness, peanut butter crunch, and caramelized sweetness all in one bite. The frosting isn’t just decoration—it’s a key player, adding a smooth, creamy contrast to the cake’s texture.
This recipe is designed to impress without being overly complicated, making it perfect for bakers of all skill levels. Whether you’re feeding a crowd or treating yourself, this Butterfinger-chocolate cake delivers on every level.
Ready to bake? The process is straightforward: mix the cake batter, fold in crushed Butterfinger bars for texture, bake in layers, and assemble with the signature frosting. The result is a showstopping dessert that tastes as good as it looks. Let’s get started!
Ingredients for butterfinger cake recipe with chocolate cake
Crushed Butterfinger bars, rich cocoa, and velvety peanut butter cream—this list delivers pure indulgence.
| Ingredient | Amount | Notes |
|---|---|---|
| Butterfinger Candy Bars 🍫 | 16 oz | Crushed into fine pieces |
| Unsalted Butter 🧈 | 1 ½ cups | Room temperature, softened |
| Granulated Sugar 🍚 | 2 ½ cups | Superfine preferred for smoothness |
| Light Brown Sugar 🍚 | 1 ½ cups | Packed firmly |
| Large Eggs 🥚 | 6 whole | Room temperature, separated |
| All-Purpose Flour 🌾 | 3 cups | Sifted, spooned lightly |
| Cocoa Powder 🍫 | ¾ cup | Dutch-processed for richness |
| Baking Powder 🧂 | 1 ½ tbsp | Freshly measured |
| Salt 🧂 | ½ tsp | Fine sea salt |
| Vanilla Extract 🌿 | 2 tsp | Pure Madagascar preferred |
| Whole Milk 🥛 | 1 cup | Room temperature |
| Peanut Butter 🥜 | ½ cup | Creamy, natural style |
| Heavy Whipping Cream 🥛 | 2 cups | Cold for buttercream |
| Powdered Sugar 🍚 | 4 cups | Sifted for smooth frosting |
| Butterfinger Buttercream Mix 🍫 | 1 package | 15.25 oz box (or homemade) |
The Butterfinger bars are the star here—Nestlé's full-size bars work best for that perfect crunch. Grab a family-size bag from Target or Walmart to save time crushing. For the cocoa, Hershey's Special Dark is my go-to, but Ghirardelli takes it to the next level. The butter needs to be room temperature—microwave 20 seconds if it's too firm. Pro tip: crush half the Butterfinger bars for the cake and reserve the rest for garnish. The peanut butter should be natural, no-stir—just scoop and go.
No Butterfinger bars? Crushed peanut butter cups (like Reese's) work in a pinch, though the caramelized flavor won't be identical. Running low on cocoa powder? Melted dark chocolate chips (cooled) can substitute at 1:1, but the texture will be denser. The buttercream mix can be homemade by blending powdered sugar, peanut butter, and cream cheese—just add a splash of milk if it's too thick. For the cake layers, King Arthur flour gives the best rise, but any high-quality all-purpose will do. Prefer a lighter cake? Reduce the cocoa to 0.5 cups and add 0.25 cups more flour.
Store the cake layers wrapped in plastic at room temperature for 2 days or in the fridge for 5 days. The buttercream keeps for 1 week refrigerated, but bring it to room temp before using. For make-ahead magic, assemble the cake 24 hours before serving—the flavors meld beautifully. If you're not using all the frosting, freeze portions in a sealed container for up to 3 months. The crushed Butterfinger topping? Store it separately in an airtight container for 1 week—it gets stale fast.
Why You'll Love This Recipe
- No-Fuss Mixing: I swear by this recipe because it’s basically a one-bowl operation—just melt butter, toss in sugar and eggs, fold in chopped Butterfingers, and bake. No sifting, no measuring cups that disappear mid-recipe. My lazy Sunday mornings thank me every time.
- Peanut Butter-Chocolate Magic: That perfect balance of rich chocolate cake and creamy Butterfinger chunks? It’s like dessert hugged sweetness. The brown sugar adds just enough caramel depth so it’s not too heavy, and the peanut butter notes sneak in without overpowering. Honestly, I’ve never met a slice that didn’t get devoured in two bites.
- Party in a Box: This cake is my go-to for birthdays, game days, or when I just want to impress without stressing. Double the batter, add a Butterfinger buttercream, and boom—you’ve got a showstopper that tastes homemade but looks like you might have spent hours. (Spoiler: You didn’t.)
- Budget-Friendly Indulgence: Butterfingers and sugar are cheap staples, and this recipe stretches them into something ridiculous. I’ve made this for 12 people using two candy bars and still had leftovers—because nobody resists it. Plus, the eggs and butter make it feel special without breaking the bank. Win-win.
Step-by-step instructions for Butterfinger cake with chocolate cake
Here's how to create that perfect marriage of fudgy chocolate and crunchy Butterfinger goodness.
Prepare the Chocolate Cake Batter
First, preheat your oven to 350°F and grease two 9-inch round cake pans, lining the bottoms with parchment paper. In a large mixing bowl, combine the 1.5 cups unsalted butter (room temperature) with the 2.5 cups granulated sugar and 1.5 cups light brown sugar. Beat on medium speed for 3-5 minutes until light and fluffy—the mixture should nearly triple in volume and look pale and airy.
Add the 6 whole large eggs one at a time, beating well after each addition. Stir in the 2 teaspoons vanilla extract, then sift in the 3 cups all-purpose flour, 0.75 cup cocoa powder, 1.5 tablespoons baking powder, and 0.5 teaspoon salt. Mix on low speed just until combined—you should still see some flour streaks. Pour the batter evenly between the prepared pans and smooth the tops.
Bake the Cake Layers
Bake the cakes for 30-35 minutes or until a toothpick inserted in the center comes out clean. Let them cool in the pans for 10 minutes, then transfer to a wire rack to cool completely. While they're baking, crush the 16 oz Butterfinger candy bars into fine pieces using a food processor or strong plastic bag and rolling pin.
Here's the thing—don't overbake these layers. You want them moist and tender, not dry. If the toothpick test shows a few moist crumbs, that's perfect. The cakes will continue setting as they cool, so pull them out just before they're fully done.
Prepare the Butterfinger Swirl Filling
In a medium saucepan, combine the 0.5 cup peanut butter, 1 cup whole milk, and 1 cup granulated sugar (reserved from the batter). Bring to a gentle simmer over medium heat, stirring constantly for 3-5 minutes until smooth and slightly thickened. Remove from heat and stir in the crushed Butterfinger pieces until fully melted and incorporated.
Let this mixture cool to room temperature—it should be thick enough to pipe but still spreadable. If it sets up too much, gently reheat it for 10-15 seconds in the microwave. The filling needs to be workable but not runny when you assemble the cake.
Assemble the Cake Layers
Place the first cake layer on a cake stand or plate. Spread about ½ cup of the Butterfinger filling evenly over the top, leaving a ½-inch border around the edges. Sprinkle some of the remaining crushed Butterfinger pieces over the filling for extra crunch. Repeat with the second layer.
For the sides, spread the remaining filling over the entire cake, then press the rest of the crushed Butterfinger pieces into the sides and top. This creates that signature crunchy exterior that makes this cake so special. Chill the assembled cake in the refrigerator for 30 minutes to let the filling set.
Frost and Finish the Cake
Prepare the Butterfinger Buttercream Mix according to package instructions using the 2 cups heavy whipping cream and 4 cups powdered sugar. Spread a thin layer of buttercream over the entire cake to seal in the filling, then chill for another 15 minutes to firm up.
Once set, add the final layer of buttercream, smoothing it with a spatula or bench scraper. Use a serrated knife to create decorative swirls or patterns on the sides. Finish with additional crushed Butterfinger pieces pressed into the sides and top for that signature look. Serve at room temperature for the best texture and flavor experience.
Pro Tips For Making Butterfinger Cake Recipe With Chocolate Cake
- CHOP CANDY SMALL: Butterfinger bars have a stubborn crunch—chop them into tiny, even pieces (think rice-sized) so they melt evenly into the batter. I used to skip this and ended up with chunks that stayed chewy instead of blending in.
- CREAM BUTTER COLD: Take your unsalted butter straight from the fridge and let it sit out for just 10 minutes before creaming with sugars. Too soft? It’ll turn greasy. Too cold? The mixer will fight you—this is the Goldilocks zone for fluffy layers.
- STOP WHEN CENTER JIGGLES: The cake’s done when a toothpick comes out clean and the center wobbles like Jell-O. Overbaking dries out the Butterfinger flavor, and nobody wants a brick. Pull it early if you’re nervous—it’ll keep cooking with residual heat.
- LAYER CHOCOLATE FIRST: Spread the chocolate cake batter in the pan first, then top with the Butterfinger mixture. The chocolate stays moist longer this way, and the Butterfinger crunch doesn’t sink to the bottom like a lazy layer. (Yes, I’ve done that. No, it’s not ideal.)
Storing and reheating your butterfinger cake recipe with chocolate cake
Room Temperature Storage
This cake shines when served at room temperature, but if you need to store it, keep the fully assembled cake wrapped in plastic wrap and placed in an airtight container for up to 2 days.
The buttercream and cake layers will soften slightly, so let it sit at room temperature for 30 minutes before slicing to restore the perfect texture. I always store my cake in the original cake stand covered with a damp towel to prevent drying—this keeps the frosting looking fresh. 💛
Fridge Storage Tips
For longer storage, refrigerate the cake in an airtight container for up to 5 days. The cold temperatures will firm up the buttercream, so bring it back to room temperature before serving.
I recommend slicing the cake into individual portions and wrapping each slice tightly in plastic wrap before refrigerating—this prevents the frosting from absorbing fridge odors and keeps each slice perfectly moist. 🧊
Freezing the Cake
You can freeze the fully assembled cake for up to 3 months for future celebrations. Wrap the cake tightly in plastic wrap, then place it in a freezer bag with all the air squeezed out.
When ready to serve, thaw the cake in the refrigerator overnight, then let it sit at room temperature for 1 hour before slicing. The texture will be slightly denser after freezing, but the flavors remain rich and delicious.
For best results, freeze the cake without the crushed Butterfinger topping—add it fresh after thawing. ❄️
Reheating Slices
If you've stored individual slices in the fridge, reheat them in the microwave for 10-15 seconds on 50% power to soften the frosting without melting it completely.
For a stovetop method, place the slice on a heatproof plate and warm it over low heat for 1-2 minutes—this gently revives the cake's texture while keeping the Butterfinger crunch intact. Avoid high heat, as it can make the frosting too runny. 🔥
Reviving Dried Cake
If your cake loses moisture over time, don’t worry—there’s a quick fix. Brush the top and sides with 2 tablespoons warm water or simple syrup (equal parts sugar and water, heated until dissolved), then cover with plastic wrap and let it sit for 10 minutes.
The moisture will rehydrate the cake layers without altering the frosting. This trick works especially well if you’ve stored the cake for a few days and want to bring it back to its original glory. 💡
Crushed Butterfinger Care
The crushed Butterfinger pieces are the star of this cake, but they can lose their crunch if stored improperly. Keep any leftover crushed pieces in an airtight container at room temperature for up to 1 week.
For longer storage, freeze them in a small freezer bag for up to 1 month. To use, simply thaw at room temperature for 5 minutes before pressing onto the cake. This preserves that perfect crunchy texture in every bite. 🍫
Nutrition facts
Frequently asked questions
Can I make this Butterfinger cake without a food processor for crushing the candy bars?
Use a heavy-duty plastic bag and a rolling pin—place the candy bars in the bag, seal it tightly, and roll over the bars with the pin until they're finely crushed. For extra speed, freeze the bars for 10 minutes first—they'll break apart more easily.
How do I adjust this recipe for a smaller cake (6-inch pans) or larger crowd (10-inch pans)?
For 6-inch pans, reduce all ingredients by 50% (3 oz Butterfinger bars, 0.75 cups butter, etc.). For 10-inch pans, increase by 150%—just bake the layers for 40-45 minutes (they'll need more time). Always check doneness with a toothpick.
Can I substitute peanut butter cups for Butterfinger bars?
Yes, but the flavor will differ slightly. Use 16 oz crushed peanut butter cups (like Reese's) and add 1 teaspoon vanilla extract to the filling to compensate for the missing caramelized notes. The texture will be similar, but the peanut butter flavor will be more dominant.
Why did my cake layers sink in the middle?
This usually happens from overmixing the batter or opening the oven too soon. Mix just until combined (you should still see flour streaks), and avoid opening the oven for 25 minutes of baking. If it happens, try baking at 325°F next time for a slower rise.
How can I make this cake gluten-free?
Replace the all-purpose flour with a 1:1 gluten-free baking flour blend (like Bob's Red Mill) and add 1 teaspoon xanthan gum to the dry ingredients. Reduce the milk by 2 tablespoons** to compensate for moisture differences. Test the blend first in a small batch.