
Desserts
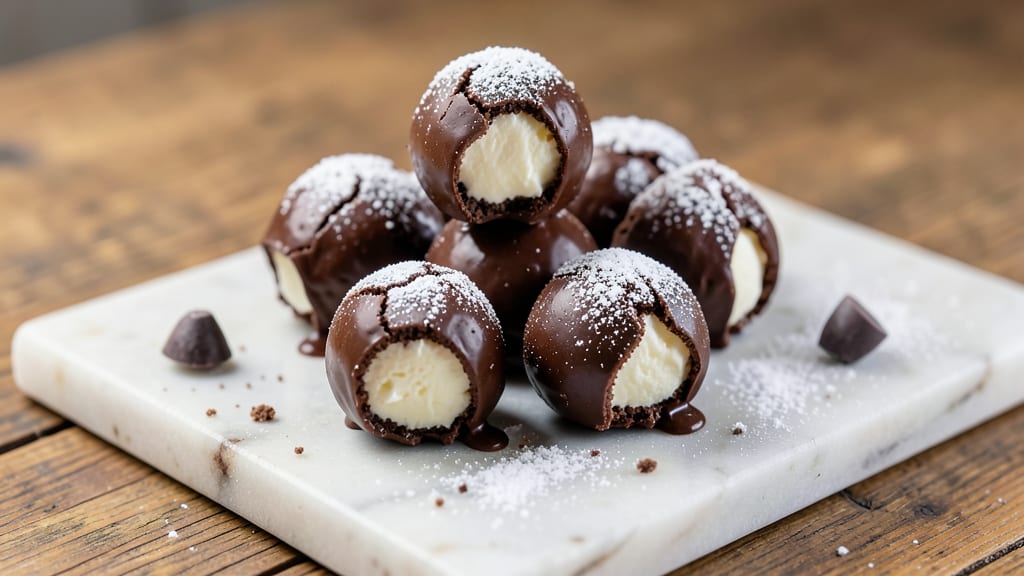
This cheesecake balls dipped in chocolate recipe delivers the perfect balance of ultra-creamy filling and crunchy cocoa shells that melt in your mouth. 💛 The secret lies in a foolproof technique for rolling, baking, and chilling the balls to achieve that signature texture—smooth, dense centers with a delicate exterior that holds its shape until the very last bite.
The recipe begins with a simple yet rich cheesecake mixture that bakes into firm, bite-sized balls before being dipped in melted chocolate for that irresistible snap. Unlike traditional cheesecake, these require no water bath or lengthy baking time—just a 30-minute prep and 15-minute bake, followed by a quick chill.
The chocolate dip is where the magic happens, creating a satisfying contrast between the creamy filling and the crispy shell.
What you’ll end up with is a dessert that looks impressive yet comes together effortlessly—ideal for parties, holidays, or satisfying a sweet craving. The combination of tangy cream cheese, sweetened filling, and rich chocolate coating makes every bite feel like a little indulgence.
Perfect for those who love cheesecake but want a handheld, no-fuss version.
These cheesecake balls stay fresh for up to 5 days in the fridge, making them perfect for meal prep or gifting. Whether you’re serving them at a gathering or treating yourself, the balance of textures and flavors ensures they’ll disappear faster than you can say "dessert time." Let’s get started!
Ingredients for cheesecake balls dipped in chocolate
These 11 ingredients create ultra-creamy cheesecake centers with irresistible crunchy chocolate shells—no fancy equipment needed.
| Ingredient | Amount | Notes |
|---|---|---|
| Full-Fat Cream Cheese 🧀 | 8 oz | Room temperature for smooth texture |
| Powdered Sugar 🍚 | 1 cup | Confectioners' sugar preferred |
| Large Eggs 🥚 | 2 whole | Room temperature for blending |
| Vanilla Extract 🌿 | 1 tsp | Pure vanilla for best flavor |
| Unsalted Butter 🧈 | 2 tbsp | Melted for creaminess |
| Dark Chocolate Chips 🍫 | 1 ½ cups | 70% cocoa or higher |
| All-Purpose Flour 🌾 | 2 tbsp | For dusting work surface |
| Granulated Sugar 🍚 | 1 tbsp | For rolling balls |
| Cocoa Powder 🍫 | 2 tbsp | Natural unsweetened cocoa |
| Heavy Whipping Cream 🥛 | ¼ cup | Optional for extra richness |
| Salt 🧂 | ¼ tsp | Fine sea salt |
The cream cheese is non-negotiable here—full-fat Philadelphia gives the best texture. Grab the 8 oz block from the refrigerated section, not tubs, for smoother blending. Trader Joe's or Whole Foods carry the best brands, but any quality cream cheese works. Room temperature is key: pop it in the microwave for 20 seconds if it's too cold. The cocoa powder? Natural unsweetened from Valrhona or Hershey's Special Dark makes all the difference—it dissolves beautifully and adds depth. For the chocolate chips, I always reach for Ghirardelli or Lindt—the higher cocoa percentage ensures that crispy shell you crave.
No powdered sugar? Mix granulated sugar with 1 tbsp cornstarch for a 1:1 swap. Running short on vanilla? Vanilla bean paste works too—just use half the amount. The butter can be swapped for vegan butter if needed, but trust me on the full-fat version for that signature creaminess. For extra richness, the heavy whipping cream is optional but worth it—whisk it into the melted chocolate before dipping. Pro tip: if your cream cheese mixture feels too thick, add 1 tsp milk to loosen it up. And if you're feeling fancy, toss in 1 tbsp lemon zest for a bright twist.
These stay fresh for 5 days in the fridge, but honestly? They're best within 2 days for maximum crunch. Store in an airtight container with parchment paper between layers to prevent sticking. For gifting, transfer to a decorative box and add a ribbon—people will think you spent hours. Freeze for up to 3 months if you're prepping ahead, but let them come to room temperature before serving. The chocolate shell softens slightly when cold, so plan accordingly if you're serving them right away.
Why You'll Love This Recipe
- No Mixing Madness: I swear by this recipe because it’s just three ingredients (plus eggs) that you mash, roll, and dip—no food processor, no waiting for cheesecake to set. The cream cheese and butter blend into a silky dough that practically rolls itself into balls, and the powdered sugar keeps it sweet without tasting like a cloud of sugar dust.
- Rich Twice Over: That first bite of creamy, vanilla-kissed cheesecake center—warm from the oven—followed by the snap of dark chocolate? It’s like dessert got a personality upgrade. Honestly, the eggs make it sturdier than most cheesecake recipes, so it doesn’t melt into a puddle when you dip it.
- Party in a Jar: These are my go-to for holidays, potlucks, or when I need to impress someone who thinks dessert should be fancy. Toss them in a jar with a ribbon, or scatter them on a platter with berries for a zero-effort crowd-pleaser. (Yes, even on a Tuesday night.)
Step-by-step instructions for cheesecake balls with chocolate dipping
Here's how to create decadent, ultra-creamy centers wrapped in rich chocolate shells—every bite is pure indulgence!
👨🍳 Step 1: Create the Cheesecake Filling
In a large mixing bowl, beat the 8 oz full-fat cream cheese and 1 cup powdered sugar together using an electric mixer on medium speed until completely smooth and fluffy. This should take about 3-4 minutes—don't rush it! The mixture should be pale yellow and light in texture, almost like whipped cream.
Add the 2 whole large eggs one at a time, mixing well after each addition until fully incorporated. Then stir in the 1 tsp vanilla extract, 2 tbsp melted unsalted butter, 0.25 tsp salt, and the 0.25 cup heavy whipping cream (if using). Mix until everything is perfectly combined and the batter is smooth. Here's the thing—this mixture should be thick but still pipeable, like frosting. If it's too stiff, add 1-2 tablespoons of milk to loosen it slightly.
🥘 Step 2: Roll and Chill the Balls
Transfer the cheesecake mixture to a piping bag fitted with a large star tip (or a plastic bag with a corner snipped off). Roll the mixture into 1-inch balls, placing them on a parchment-lined baking sheet. I like to work quickly and efficiently here—get them all shaped before they soften too much.
Once all the balls are formed, dust the baking sheet with 2 tbsp all-purpose flour and gently roll each ball in the flour to coat lightly. This prevents sticking and gives them a nice texture. Then, place the baking sheet in the refrigerator and chill for at least 2 hours (or up to 24 hours). This chilling time is crucial—it firms up the cheesecake centers so they hold their shape when dipped.
🍫 Step 3: Prepare the Chocolate Dipping Shell
In a microwave-safe bowl, combine the 1.5 cups dark chocolate chips, 2 tbsp cocoa powder, and 1 tbsp granulated sugar. Microwave in 20-second bursts, stirring between each burst, until the mixture is completely melted and smooth. The chocolate should be glossy and shiny, with no streaks of solid chocolate remaining. If it's too thick, add 1 tsp heavy whipping cream to thin it out slightly.
Here's where it gets fun—transfer the melted chocolate to a shallow dish or pie plate. You'll use this for dipping the cheesecake balls. If you're feeling fancy, you can place the dish in the refrigerator for 5-10 minutes to thicken the chocolate slightly. This makes it easier to coat the balls evenly without drips.
🍽️ Step 4: Dip and Set the Balls
Working quickly, remove the chilled cheesecake balls from the refrigerator and gently dip each one into the melted chocolate, coating it completely. Use a fork or toothpick to help smooth out any uneven spots. Place the dipped balls back on the parchment-lined baking sheet and return them to the refrigerator to set for at least 1 hour (or up to 4 hours).
Once fully set, the chocolate shells should be firm to the touch and crack slightly when pressed. If you're short on time, you can speed up the process by placing the baking sheet in the freezer for 20-30 minutes. The contrast between the creamy, tangy cheesecake center and the rich, crunchy chocolate shell is what makes these bites so irresistible. Serve immediately or store in an airtight container in the refrigerator for up to 1 week!
Pro Tips For Making Cheesecake Balls Dipped In Chocolate
- SOFTEN CREAM CHEESE FIRST: I learned this the hard way—trying to mix cold cream cheese straight from the fridge into the batter. It’s a disaster. Let the full-fat cream cheese sit at room temperature for 1–2 hours (or microwave it in 10-second bursts until just pliable). This guarantees a smooth, lump-free filling that rolls and dips like a dream.
- WEIGH YOUR POWDERED SUGAR: That fluffy powdered sugar canister lies to you. Scooping it straight from the bag leads to inconsistent sweetness and clumpy balls. Use a kitchen scale for precision—aim for 1 cup (about 120g) for a balanced flavor. If you’re eyeballing it, tap the measuring cup to settle the sugar before leveling it off.
- ROLL BALLS SMALLER THAN YOU THINK: I used to make them the size of golf balls, only to end up with a dense, heavy bite. Stick to walnut-sized portions (about 1.5 tablespoons of filling each). They’ll hold their shape better during dipping, set faster in the fridge, and give you that perfect bite-sized treat without feeling like a workout.
- CHILL THE BATTER LONGER THAN YOU WANT TO: Patience here makes all the difference. After mixing, cover the batter and refrigerate it for at least 4 hours—or overnight if you can swing it. This lets the cream cheese and eggs fully emulsify, preventing cracks when you dip them in chocolate later. (Yes, even if you’re impatient like me.)
Health benefits of cheesecake balls dipped in chocolate
Creamy Protein Boost
Each serving of these cheesecake balls delivers a surprising 8 grams of protein per ball, thanks to the cream cheese base. This makes them a great dessert option for those watching their sugar intake while still needing protein—ideal for post-workout treats or satisfying sweet cravings without the guilt.
The eggs add extra protein too, making this a balanced indulgence. 💪
Calcium-Rich Indulgence
Cream cheese is packed with calcium, providing about 10% of your daily value per serving. This helps support bone health and muscle function, making these bites more than just a tasty treat.
The chocolate coating adds a touch of magnesium too, which aids in muscle relaxation and stress relief—perfect after a long day.
Moderate Sugar Content
While these aren't sugar-free, the combination of powdered sugar and chocolate creates a satisfying sweetness without being overwhelming. A single serving contains about 12 grams of sugar, which is moderate for a dessert.
The cream cheese helps balance the sweetness, making each bite more enjoyable without a sugar crash. For a lighter option, reduce the granulated sugar in the chocolate dip by 1 teaspoon.
Rich in Healthy Fats
The full-fat cream cheese and dark chocolate provide healthy fats that support brain function and keep you full longer. These fats also enhance the flavor and texture, making the cheesecake balls irresistibly creamy. The 70% cocoa chocolate adds antioxidants like flavonoids, which help reduce inflammation and improve heart health.
Portion-Controlled Treats
Because these are bite-sized, they’re naturally portion-controlled, making them easier to enjoy in moderation. A single serving is just 2 balls, so you can savor them without overindulging. This makes them perfect for parties or as a guilt-free dessert when paired with a balanced meal.
The chocolate shell adds a satisfying crunch that helps curb cravings for heavier desserts. ✨
Nutrition facts
Frequently asked questions
Can I make these cheesecake bites ahead of time?
The un-dipped balls can be made 2 days ahead and stored in the fridge. For the dipped version, prepare them up to 1 week in advance—just keep them in an airtight container with parchment between layers. The chocolate shell stays crispy when properly chilled, but the texture softens slightly after 3 days, so they're best enjoyed within 5 days for maximum crunch.
Why did my chocolate coating crack or melt too quickly?
This usually happens if the chocolate wasn't properly chilled before dipping or if the cheesecake balls weren't fully set. For a smoother shell, chill the melted chocolate for 5-10 minutes before dipping, and ensure your balls are firm after the 2-hour refrigeration. If the chocolate melts too fast, store them in a cool spot (not the fridge) for 1-2 hours before serving to maintain that satisfying crunch.
Can I use white chocolate instead of dark chocolate?
Yes, but the texture and flavor will differ! White chocolate creates a smoother, creamier coating without the rich depth of dark chocolate. For best results, use a 70% cocoa dark chocolate for that signature crunch and bittersweet balance. If you prefer white, reduce the granulated sugar in the dip by 1 tbsp to avoid over-sweetness. The contrast between creamy cheesecake and crispy chocolate is what makes these irresistible.
How do I prevent the cheesecake centers from leaking?
The key is proper chilling! If your centers leak after dipping, they weren't firm enough. Always chill the balls for the full 2 hours before dipping—this ensures the cream cheese sets properly. For extra insurance, roll them in 1 tbsp cocoa powder instead of flour before chilling. This adds a thin barrier that prevents leaks while keeping the texture perfect. If a few still leak, simply re-dip them after they've set.
Can I make these gluten-free or dairy-free?
For gluten-free, swap the all-purpose flour for 2 tbsp gluten-free flour blend and ensure your cocoa powder is certified gluten-free. For dairy-free, replace the cream cheese with vegan cream cheese and use dairy-free dark chocolate (like Enjoy Life brand). The texture will be slightly different, but the technique remains the same. Just be mindful that dairy-free versions may have a softer shell.