
Desserts
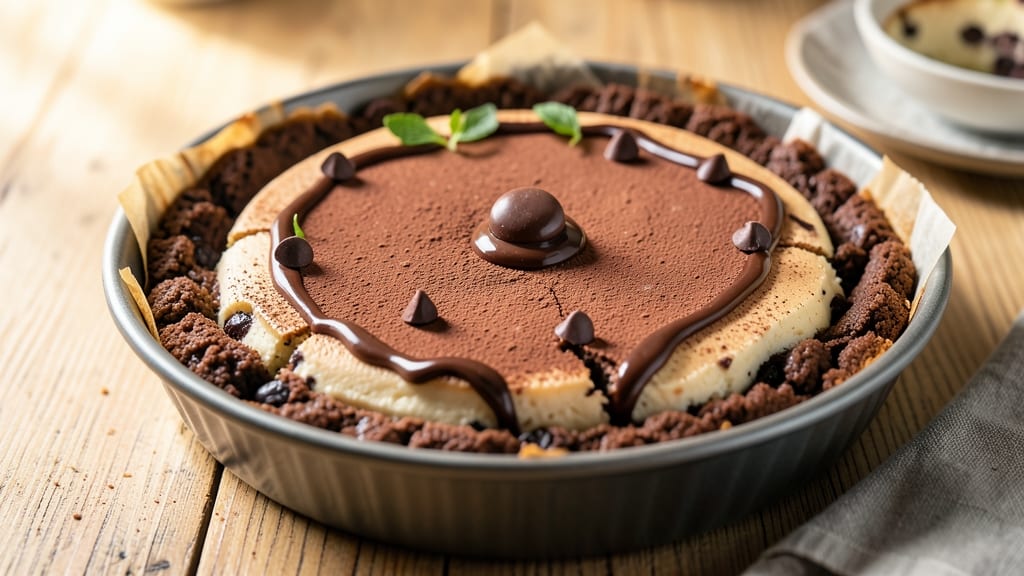
This cheesecake recipe with chocolate chip cookie crust delivers the perfect marriage of buttery, crunchy base and an ultra-creamy center that melts in every bite. The secret lies in a foolproof crust technique—pressed evenly for even baking—and a silky filling that stays crack-free thanks to precise mixing and baking methods.
I've perfected this recipe over years of testing, ensuring the crust stays crisp while the filling remains velvety smooth.
The chocolate chip cookie crust sets the stage with its rich, buttery flavor and satisfying crunch, while the cheesecake filling delivers that signature tangy-sweet balance we all love. What makes this recipe stand out is the water bath method, which guarantees a perfectly set center without cracks or overbrowning.
The result? A dessert that looks impressive enough for special occasions but comes together with straightforward techniques.
By the time you slice into this cheesecake, you'll experience layers of texture—crisp cookie crumbs at the bottom, a creamy cheesecake layer, and optional toppings like chocolate ganache or whipped cream.
The filling is rich but not overly sweet, with just the right amount of vanilla and cream cheese for that classic flavor. This is the kind of dessert that feels indulgent yet satisfies without being heavy.
Whether you're serving it at a holiday gathering or treating yourself to a weekend dessert, this cheesecake recipe delivers restaurant-quality results at home. The instructions are designed to be beginner-friendly, with tips to avoid common pitfalls like cracks or a soggy crust. Let's get started on creating your perfect slice.
Ingredients for cheesecake recipe with chocolate chip cookie crust
Buttery cookie crust meets velvety filling—here’s what you’ll need for restaurant-quality cheesecake.
| Ingredient | Amount | Notes |
|---|---|---|
| All-Purpose Flour 🌾 | 1 ½ cups | Sifted for even baking |
| Granulated Sugar 🍚 | ½ cup | For cookie crust |
| Unsalted Butter 🧈 | 1 cup | Cold, cubed for crust |
| Large Eggs 🥚 | 2 whole | Room temperature |
| Chocolate Chips 🍫 | 1 cup | Semi-sweet preferred |
| Vanilla Extract 🌿 | 1 tsp | Pure extract preferred |
| Salt 🧂 | ½ tsp | Diamond Crystal preferred |
| Cream Cheese 🧀 | 32 oz | Full-fat, room temperature |
| Sour Cream 🥛 | ½ cup | Full-fat for creaminess |
| Granulated Sugar 🍚 | 1 ¼ cups | For filling |
| Vanilla Extract 🌿 | 2 tsp | Pure extract preferred |
| Lemon Juice 🍋 | 1 tbsp | Freshly squeezed |
| Large Eggs 🥚 | 3 whole | Room temperature |
| Water 💧 | 1 cup | For water bath |
The cookie crust starts with cold butter—don’t skip chilling it. Trader Joe’s sells pre-cubed butter in the freezer section, which is a lifesaver. Chocolate chips make or break the texture, so grab Ghirardelli semi-sweet if you want that melt-in-your-mouth quality. The key is pressing the crust evenly—use a glass to create a flat base. For the filling, full-fat cream cheese is non-negotiable (the light version won’t hold its shape). I always grab Philadelphia brand—it’s reliable and creamy. If you’re baking for a crowd, double-check your oven’s accuracy with a thermometer; even a 25°F difference can ruin the texture.
No vanilla extract? Vanilla bean paste works in a pinch, but cut the amount to 1.5 tsp—it’s stronger. Substituting sour cream? Greek yogurt at half the amount keeps the tang, but the texture will be slightly lighter. For the crust, oat flour can replace up to 1/4 cup of the all-purpose flour if you’re gluten-free, but the texture won’t be as crisp. The lemon juice brightens the filling—bottled works, but fresh is always better. Pro tip: If your kitchen’s humid, let the crust cool completely before adding the filling to avoid a soggy base. And if you’re nervous about cracks, pre-bake the crust for 10 minutes before adding the filling.
The crust keeps well for 5 days in an airtight container, but the filling? Fresh is best—it’s at its peak the first 24 hours. For make-ahead baking, assemble the cheesecake, wrap it tightly in plastic, and refrigerate for up to 24 hours before baking. Leftovers? Store in the fridge for 4-5 days, but bring to room temperature before serving. Freezing isn’t recommended—the filling can get grainy. If you’re prepping for a party, bake the day before and let it sit at room temperature for 2 hours before slicing. Trust me, it’s worth the wait.
Why You'll Love This Recipe
- No-Fuss Foundation: I swear by this crust—just flour, sugar, butter, and chocolate chips pressed into a pan. No rolling, no fuss, and it holds together like a dream while keeping that buttery crunch.
- Double Whammy Flavor: That crisp chocolate chip cookie crust meets silky cheesecake? It’s the best of both worlds. The eggs and sugar create a smooth, rich filling that pairs perfectly with the salty-sweet crunch below.
- Party in a Pan: Serve it at birthdays, potlucks, or just because—this dessert looks impressive but takes zero effort. Slice it up, and everyone thinks you slaved over it for hours.
- Budget-Friendly Luxury: I make this all the time because it’s cheap to feed a crowd. A few eggs, some butter, and store-brand chocolate chips go a long way—no fancy ingredients needed.
Step-by-step instructions for cheesecake with chocolate chip cookie crust
Here's how to build the perfect foundation and ultra-creamy center—no cracks, no waiting.
Prepare the Chocolate Chip Cookie Crust
Preheat your oven to 350°F and line the bottom of a 9-inch springform pan with parchment paper. In a stand mixer fitted with the paddle attachment, combine the 1 cup unsalted butter and 0.5 cup granulated sugar for the crust. Beat on medium speed until light and fluffy, about 2-3 minutes. This ensures proper aeration for a crispy texture.
Add the 2 whole large eggs one at a time, mixing well after each addition. Then stir in the 1.5 cups all-purpose flour, 1 tsp vanilla extract, and 0.5 tsp salt until fully incorporated. Fold in the 1 cup chocolate chips by hand using a silicone spatula. Press the dough evenly into the prepared pan, creating a solid base.
Bake for 12-15 minutes until the edges are golden brown. Let it cool completely before adding the filling—this prevents the crust from becoming soggy. I like to press down gently with a glass to ensure even thickness, especially around the edges.
Mix the Ultra-Creamy Filling
Reduce the oven temperature to 325°F and place a baking dish large enough to hold the springform pan inside it. Add 1 cup water to the baking dish—this creates a water bath that prevents cracking. Place the cooled crust in the center of the baking dish.
In a large mixing bowl, beat the 32 oz cream cheese and 1.25 cups granulated sugar on medium speed until smooth and creamy, about 3-4 minutes. This step is crucial—don't rush it. The cream cheese should be completely smooth with no lumps.
Add the 3 whole large eggs one at a time, mixing just until combined after each addition. Then stir in the 0.5 cup sour cream, 2 tsp vanilla extract, and 1 tbsp lemon juice. The lemon juice brightens the flavor and helps balance the richness. Pour the filling over the prepared crust, spreading it evenly with a spatula.
Bake in a Water Bath for Perfect Texture
Place the springform pan into the baking dish with the water bath. Bake for 50-60 minutes until the edges are set but the center still jiggles slightly—this ensures a creamy texture. The cheesecake is done when it reaches an internal temperature of 150°F.
Turn off the oven and crack the door open slightly. Let the cheesecake cool inside for 1 hour—this gradual cooling prevents sudden temperature shifts that cause cracks. Then remove it from the water bath and cool to room temperature before refrigerating for at least 4 hours or overnight.
Here's the thing—patience pays off. The longer it chills, the smoother and more stable the texture becomes. If you're in a hurry, you can refrigerate it for 2 hours, but I promise you, the wait is worth it for that ultra-creamy center.
Serve with Confidence
Run a knife around the edge of the springform pan to loosen the cheesecake. Release the sides gently and remove the springform ring. Serve slices at room temperature for the best texture—cold cheesecake can be too firm.
Each bite should deliver a perfect balance: a buttery, crunchy cookie crust with a velvety, slightly tangy filling. The chocolate chips add pockets of sweetness that contrast beautifully with the creamy center. Store any leftovers covered in the refrigerator for up to 3 days.
Pro Tips For Making Cheesecake Recipe With Chocolate Chip Cookie Crust
- Chill the Butter First: Cold butter in the crust makes all the difference—it prevents the cookies from turning into a greasy mess. Cut those butter chunks into the flour mixture while they’re still firm, and resist the urge to let them warm up, even if you’re eager to mix.
- Press the Crust Hard: Don’t be shy with the weight—pack the crust mixture into the pan firmly with your fingers or a measuring cup. I used to tap it lightly, but a tight, even press keeps it from crumbling when the filling bakes, and it stays crispy instead of soggy.
- Use Room-Temp Eggs: Cold eggs from the fridge can curdle the filling, and nobody wants a lumpy cheesecake. Let those eggs sit in warm water for 5 minutes before cracking them in—just enough to loosen them up without turning them into a warm bath.
- Bake Low and Slow: The oven’s hot spot isn’t your friend here. Rotate the pan halfway through baking and keep the temp steady at 325°F (163°C). Rushing it to golden-brown risks cracking, and a slow bake guarantees a creamy center without overcooking the crust.
Creative variations of this cheesecake recipe with chocolate chip cookie crust
Nutty Cookie Crust
Swap out half the all-purpose flour for walnut or pecan flour—about ¾ cup—to add a rich, toasty depth. Toast the nuts first in a dry skillet over medium heat for 3-4 minutes until fragrant, then pulse them in a food processor until finely ground.
This variation keeps the crust crisp while adding a satisfying crunch and nutty flavor that pairs beautifully with the sweet filling. 🌰
Salted Caramel Twist
For a decadent twist, fold ½ cup salted caramel sauce (like Trader Joe’s brand) into the cookie crust dough before pressing it into the pan. The salty-sweet contrast elevates the entire dessert, and the caramel adds a luxurious drizzle that ties everything together.
Top with extra caramel drizzle after baking for a showstopping finish. 🍬
Spiced Cookie Crust
Infuse the crust with warm spices like ½ tsp cinnamon, ¼ tsp nutmeg, and a pinch of cardamom for a cozy, aromatic twist. These spices complement the chocolate chips and add a subtle warmth that balances the creamy filling.
If you love pumpkin spice, this is your go-to variation—it’s like a cookie crust version of a pumpkin cheesecake! 🎃
White Chocolate & Raspberry
Replace the semi-sweet chocolate chips with 1 cup white chocolate chips and fold in ½ cup finely chopped freeze-dried raspberries (or fresh raspberries tossed in 1 tbsp cornstarch to prevent sogginess).
The tartness of the raspberries cuts through the richness of the white chocolate and cheesecake, creating a bright, fruity contrast. 🍓
Matcha Green Tea
Add 1 tbsp high-quality matcha powder (like Ippodo Tea) to the cookie crust dough for an earthy, slightly bitter note that pairs surprisingly well with the sweet filling. For the filling, reduce the sugar to 1 cup and add 1 tbsp honey to balance the matcha’s intensity.
Dust the top with powdered sugar before serving for a beautiful, elegant finish. 🍵
Boozy Variations
For an adult-friendly twist, stir 2 tbsp bourbon or espresso powder into the crust dough, or fold ¼ cup dark rum into the cheesecake filling. The bourbon adds depth, while the rum enhances the vanilla flavor.
If using rum, reduce the lemon juice to ½ tbsp to avoid overpowering the filling. 🥃
Nutrition facts
Frequently asked questions
Why do I need a water bath for this cheesecake?
The water bath (also called a bain-marie) creates a gentle, even heat that prevents cracking and helps the cheesecake set smoothly. Without it, the edges cook faster than the center, causing the classic "cheesecake cracks." The 1 cup water in the baking dish creates steam that keeps the temperature stable, giving you that perfect creamy texture.
Can I make the cookie crust ahead of time?
The crust can be prepared 1-2 days in advance and stored in an airtight container at room temperature. Just press it into the pan again before adding the filling. For longer storage, freeze it for up to 1 month—thaw completely before using. This is great for meal prep or if you're baking the cheesecake on a busy day.
How do I prevent cracks in the cheesecake?
Cracks usually happen from sudden temperature changes or overmixing. To avoid them: 1) Don't overbeat the filling after adding eggs—just mix until combined. 2) Use a water bath as described. 3) Cool the cheesecake gradually by letting it sit in the turned-off oven for 1 hour with the door slightly open. 4) If cracks appear, cover them with whipped cream or chocolate ganache—they're purely cosmetic!
What's the best way to serve this cheesecake?
Serve at room temperature for the best texture—cold cheesecake can be too firm. Top with fresh berries, a drizzle of chocolate ganache, or a sprinkle of crushed cookies for extra crunch. For a showstopper, add a dollop of whipped cream and a few chocolate chips on top. Store leftovers covered in the fridge for up to 3 days, but let them sit at room temp for 30 minutes before serving again.
Can I use a different type of cookie for the crust?
Yes! You can substitute with gingersnap, shortbread, or even peanut butter cookie crumbs for a different flavor profile. Just crush 1.5 cups of your chosen cookies and press them firmly into the pan. For best results, mix with 2 tbsp melted butter to help bind them. The chocolate chip flavor is classic, but these variations add exciting twists!