
Desserts
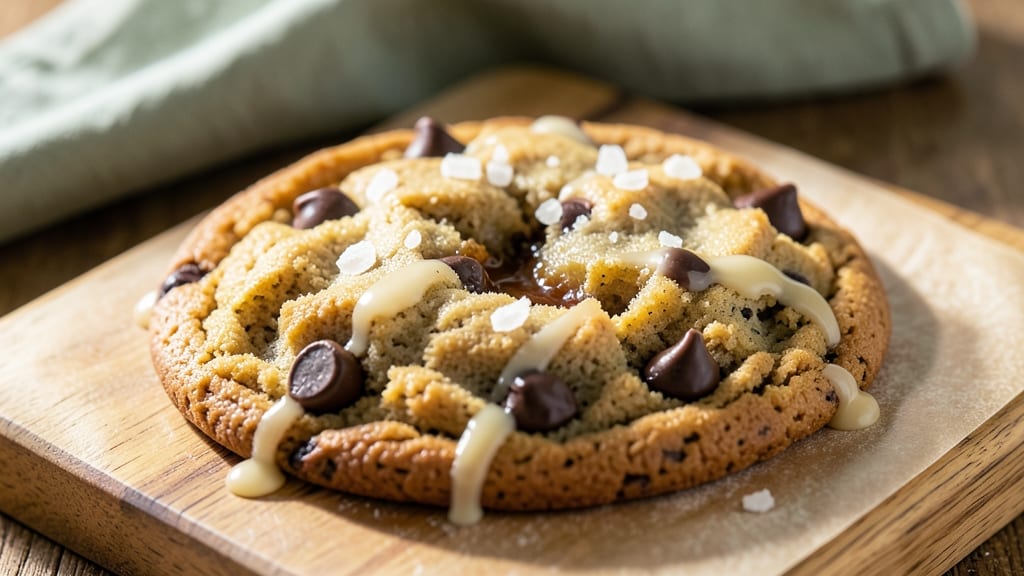
This chewy chocolate chip cookie recipe delivers the perfect balance of crispy edges and warm vanilla streaks—no more dry, cakey cookies that crumble at the first bite. The secret lies in precise mixing techniques and a dough that rests just long enough to develop flavor without overworking the gluten.
I've perfected this recipe after years of testing, and it consistently produces cookies with a tender center and caramelized edges that stay crispy for hours.
What sets these apart is the combination of brown and white sugar, which creates those signature caramel notes while maintaining the signature chewy texture.
The dough gets a 30-minute rest (critical for flavor development), and I use a mix of semi-sweet and dark chocolate chips for a balanced sweetness that never overpowers. This isn't just another cookie recipe—it's a foolproof method that transforms simple ingredients into something restaurant-quality.
The result is a cookie with a crispy, almost crackly exterior that gives way to a soft, chewy interior with pockets of melted chocolate throughout. Each bite delivers that perfect contrast of textures and flavors—vanilla from the butter, caramel from the sugar, and rich chocolate in every bite.
These cookies stay warm and delicious straight from the oven, but they're even better the next day when the flavors have fully melded.
For an extra touch of sophistication, try adding a pinch of flaky sea salt or swirling brown butter into the dough. The possibilities are endless, but the foundation remains the same—this is the chewy chocolate chip cookie recipe that finally delivers on all the promises. Let's get baking!
Ingredients for chewychocolate chip cookie
Simple ingredients that transform into restaurant-quality chewy chocolate chip cookies.
| Ingredient | Amount | Notes |
|---|---|---|
| Unsalted Butter 🧈 | 1 cup | Softened but not melted |
| Granulated White Sugar 🍚 | ¾ cup | Measured accurately |
| Packed Brown Sugar 🍚 | ¾ cup | Light or dark variety |
| Large Eggs 🥚 | 2 whole | Room temperature preferred |
| Pure Vanilla Extract 🌿 | 2 tsp | High-quality preferred |
| All-Purpose Flour 🌾 | 2 ½ cups | Sifted for consistency |
| Baking Soda 🧂 | ½ tsp | Ensures proper rise |
| Kosher Salt 🧂 | 1 tsp | Diamond Crystal preferred |
| Semi-Sweet Chocolate Chips 🍫 | 2 cups | High-quality brand |
| Dark Chocolate Chips 🍫 | ½ cup | 60-70% cocoa preferred |
| Flaky Sea Salt 🧂 | ½ tsp | For sprinkling on top |
The butter is the foundation—European-style or high-fat brands like Plugrá give the best flavor. Measure it accurately: pack it tightly into the cup to avoid air pockets. Brown sugar should be moist but not sticky; if yours is dry, microwave it for 10 seconds to restore moisture. Whole Foods and King Arthur Flour carry excellent quality. Chocolate chips make all the difference—Ghirardelli and Enjoy Life are my go-tos, but any high-quality brand works. The mix of semi-sweet and dark creates that perfect balance of sweetness and depth.
No vanilla extract? Vanilla bean paste works beautifully, or even a scraped vanilla bean. Short on brown sugar? White sugar plus 1 tsp molasses mimics the flavor. Flour too lumpy? Sift it directly into your mixing bowl. The baking soda is non-negotiable—it's what gives these cookies their signature chew. For a nutty twist, swap 0.5 cup of flour for chopped walnuts. And if you're feeling fancy, brown butter (cooked until nutty) adds an extra layer of complexity—just let it cool before mixing.
Store dough in an airtight container in the fridge for up to 48 hours—it actually improves overnight. Baked cookies keep in an airtight tin for 5 days at room temperature, or freeze for 3 months. For reheating, wrap in foil and warm at 300°F for 5 minutes. I always bake a double batch—one for the family, one for freezing. The flavor only gets better as they sit, developing those warm vanilla streaks you crave.
Why You'll Love This Recipe
- Here’s what sold me: the crisp edges from the brown sugar caramelization paired with that melt-in-your-mouth chew from the butter. It’s not too sweet, not too dry—just right. And the vanilla? A little goes a long way, but it’s the kind of flavor that makes you pause mid-bite.
- I’ll be real: this recipe costs me about $3 for a dozen cookies, and they disappear faster than my willpower. The butter and sugars stretch far, and you’re not sacrificing quality for the price. Leftovers? They last a week in an airtight container, and honestly, they taste better the next day.
Step-by-step instructions for chewy chocolate chip cookies
Master these precise techniques for cookies with crispy edges and chewy centers every time.
Cream the Butter and Sugars to Peak Fluffiness
In a stand mixer fitted with the paddle attachment, combine the 1 cup unsalted butter with the 0.75 cup granulated white sugar and 0.75 cup packed brown sugar. Beat on medium speed for 3-4 minutes until the mixture lightens in color and nearly doubles in volume. You'll notice the texture become smooth and fluffy—this is crucial for that signature chewy texture.
The reason we wait until the butter is fully creamed is that this incorporates air, which creates those beautiful crackly tops and helps the cookies spread just enough. If you rush this step, you'll end up with dense, cakey cookies instead of the tender, chewy ones we're after. I like to press my finger into the mixture occasionally—it should leave a slight indent but spring back quickly.
Incorporate Eggs and Vanilla Extract
Add the 2 whole large eggs, one at a time, mixing on low speed for 30 seconds after each addition. This gradual incorporation prevents the eggs from scrambling in the butter mixture. After the eggs are fully combined, add the 2 teaspoons pure vanilla extract and mix for another 10 seconds until just incorporated.
Here's the thing—room temperature eggs blend more smoothly, but if yours are straight from the fridge, no worries. Just let them sit at room temperature for 15-20 minutes before using. The mixture might look slightly curdled after adding the eggs, but don't panic. Once we add the dry ingredients, everything will come together beautifully.
Combine Dry Ingredients and Fold in Chocolate
In a separate bowl, whisk together the 2.5 cups all-purpose flour, 0.5 teaspoon baking soda, and 1 teaspoon kosher salt. With the mixer on low speed, gradually add this dry mixture to the wet ingredients. Mix just until combined—you should still see a few flour streaks. Overmixing develops gluten and makes cookies tough, so stop as soon as everything comes together.
Remove the bowl from the mixer and fold in the 2 cups semi-sweet chocolate chips and 0.5 cup dark chocolate chips using a silicone spatula. I like to use a mix of semi-sweet and dark chocolate for depth of flavor. Make sure the chocolate chips are evenly distributed throughout the dough. If you're using a stand mixer, switch to the dough hook attachment for this step to avoid overmixing.
Chill the Dough for Perfect Texture
Cover the bowl with plastic wrap and refrigerate for at least 30 minutes (I prefer 1 hour or even overnight). This chilling step is critical—it solidifies the butter, which prevents the cookies from spreading too thin in the oven. It also allows the flour to fully hydrate, creating better texture and ensuring those warm vanilla streaks we're after.
Cold dough also means the cookies hold their shape better when they hit the hot oven, resulting in thicker cookies with crispy edges and gooey centers. Don't skip this step, no matter how impatient you are. I've learned the hard way that skipping the chill leads to flat, cakey cookies that lack the chewy texture we want.
Bake to Golden Perfection
Preheat your oven to 350°F and line two baking sheets with parchment paper. Using a cookie scoop or tablespoon, portion the chilled dough into 2-tablespoon portions (about 1.5 ounces each) and place them 3 inches apart on the prepared sheets. You should be able to fit about 12 cookies per sheet depending on your scoop size.
Bake for 11-13 minutes until the edges are golden brown but the centers still look slightly underdone. They'll continue cooking on the hot pan after you remove them from the oven. Let them cool on the baking sheet for 5 minutes before transferring to a wire rack. This brief cooling period helps set the cookies slightly before they continue to firm up.
Pro Tips For Making Chewychocolate Chip Cookie
- Cream Butter Cold: DESCRIPTION: Take that butter straight from the fridge—no waiting for it to soften at room temp. The fat stays firm enough to hold air when you mix it with the sugars, which means lighter, chewier cookies. I learned this the hard way after making a batch that spread like pancakes on a hot griddle.
- Pack the Brown Sugar: DESCRIPTION: Don’t scoop it. Press that brown sugar into the measuring cup with a spoon—it’s packed, not loose. Too much air in there means your cookies will be denser and less chewy. And for heaven’s sake, don’t tap the cup to settle it; just press it down firmly.
- Skip the Overmixing: DESCRIPTION: Mix the dough until it just comes together—no streaks of flour, but don’t beat it like a smoothie. Overmixing develops gluten, and that turns your chewy cookies into tough, cakey disappointments. Stop when the dough clumps together when you press it with your fingers.
- Use Room-Temp Eggs: DESCRIPTION: Pull those eggs out of the fridge 30 minutes before you start. Cold eggs can cause the dough to spread unevenly, and they won’t emulsify as well with the butter. Warm eggs blend smoother and help the cookies hold their shape better—trust me, your cookies will thank you.
Pro cooking tips for chewychocolate chip cookie
Mix Like a Pro
Use a stand mixer with paddle attachment for creaming butter and sugars—this incorporates air more efficiently than hand mixing. Beat on medium speed for 3-4 minutes until the mixture is light and fluffy.
If using a hand mixer, increase speed to high and mix for 5-6 minutes to achieve the same air incorporation. The goal is to create a smooth, pale mixture that doubles in volume—this is what gives those signature crackly tops and chewy centers. 🔥
Dough Resting Secrets
Chilling the dough for at least 30 minutes (up to 24 hours) is non-negotiable. I wrap my dough tightly in plastic wrap and refrigerate it to prevent drying. For best results, let it rest overnight—the longer it chills, the more flavor develops.
Pro tip: Place the dough bowl in the freezer for 15 minutes if you're short on time—this speeds up the solidifying process without compromising texture.
Portion Control Matters
Use a cookie scoop or 2-tablespoon measure for consistent portions—1.5 ounces per cookie ensures even baking. Place dough balls 3 inches apart on parchment-lined sheets to prevent spreading. If your oven runs hot, reduce spacing to 2.5 inches and bake for 10-11 minutes.
For thicker cookies, chill the dough balls for 10 minutes before baking to slow spread.
Baking Time Precision
Bake at 350°F for 11-13 minutes until edges are golden but centers still look soft. The cookies will firm up as they cool. If your oven browning is inconsistent, rotate sheets halfway through baking.
For a dark chocolate finish, place cookies on the middle rack. For lighter tops, use the upper rack. Always let cookies cool on the sheet for 5 minutes before transferring—they'll continue setting.
Equipment Upgrades
Invest in a digital oven thermometer to ensure accurate temperature—many home ovens vary by 25°F. A silicon spatula helps fold in chocolate chips without overmixing. For even baking, use light-colored metal sheets (they reflect heat better than dark pans).
I also recommend parchment paper over silicone mats—it prevents sticking and makes cleanup effortless. 💡
Texture Troubleshooting
If cookies spread too thin, your dough wasn't chilled long enough or your oven runs hot. For thicker cookies, reduce baking time by 1-2 minutes or use less flour (start with 2.4 cups instead of 2.5).
Cakey cookies? Overmixed dough or too much flour—measure carefully and mix just until combined. For extra chewiness, add 1 tablespoon corn syrup to the dough or use bread flour instead of all-purpose.
Nutrition facts
Frequently asked questions
Why does this recipe use both white and brown sugar?
The combination creates that perfect balance of caramelized flavor and tender texture. Brown sugar adds moisture and deep caramel notes, while white sugar helps create those crispy edges. Together, they prevent the cookies from being too sweet or too dry—just the right chewy perfection.
Can I make these cookies without a mixer?
Use a sturdy bowl and hand mixer (or even a wooden spoon) to cream the butter and sugars. Mix on high for 5-6 minutes until light and fluffy—just keep an eye on it to avoid overheating. The key is patience; the dough needs that air incorporation for the best texture.
What's the secret to getting that perfect chewy texture?
Three things: 1) Chill the dough for at least 30 minutes (longer is better), 2) Use a mix of semi-sweet and dark chocolate chips for depth, and 3) Bake until edges are golden but centers still look soft. The dough resting time is non-negotiable—it develops flavor and prevents over-spreading.
How do I store these cookies to keep them fresh?
Store in an airtight container at room temperature for up to 5 days, or freeze for 3 months. For reheating, wrap individually in foil and warm at 300°F for 3-5 minutes. Pro tip: The flavor actually improves after 24 hours as the vanilla and chocolate meld together.
What if my cookies spread too much?
This usually means your dough wasn't chilled long enough or your oven runs hot. Next time, chill the dough balls for 10 minutes before baking, reduce oven temp to 340°F, or use less flour (start with 2.4 cups instead of 2.5). For thicker cookies, bake for 10-11 minutes instead of 11-13 minutes.