
Desserts
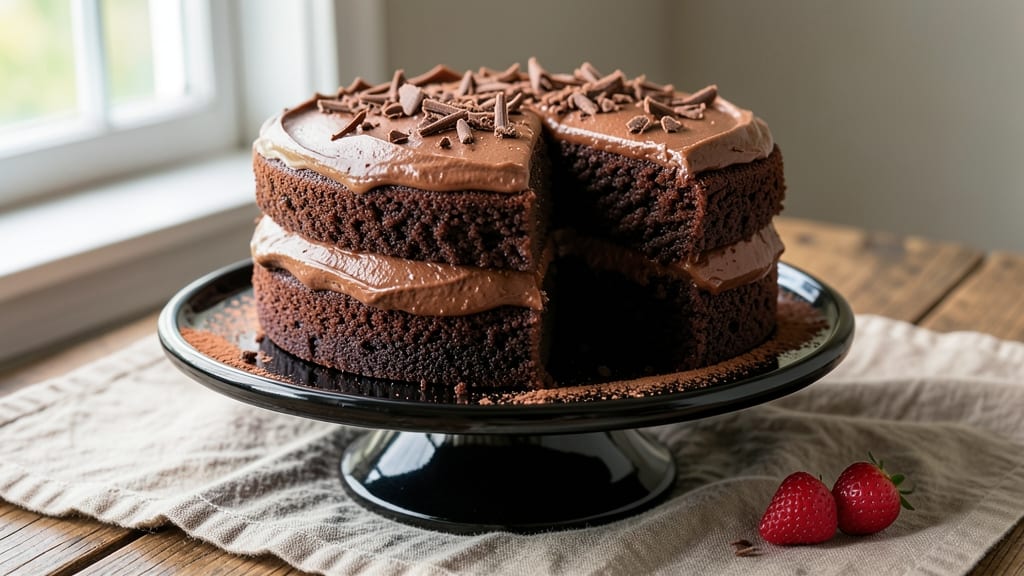
This Betty Crocker Chocolate Devil Cake recipe delivers the legendary triple-layered richness with a secret coffee infusion that keeps every slice moist for days. The original recipe's signature texture—dense yet tender, with a velvety crumb—comes from precise butter-sugar creaming and a foolproof layering technique that professional bakers swear by.
What sets this version apart is the subtle coffee note in the batter, which deepens the chocolate flavor while preventing dryness, a common pitfall in devil cakes.
The key to success lies in three critical steps: properly creaming the butter and sugar until light and fluffy (this creates the signature moistness), folding in the dry ingredients gently to avoid overmixing, and baking at the exact temperature of 350°F for 25-30 minutes per layer.
The cake layers should emerge with a slightly domed top and pull away cleanly from the pan—never overbaked, as that ruins the tender crumb. For authenticity, we use Betty Crocker's classic chocolate buttercream frosting, rich enough to hold its shape between layers but light enough to complement the cake's density.
What you'll end up with is a showstopping dessert that's moist through the first slice and maintains its structure for hours. The coffee-infused layers add complexity without overpowering the chocolate, while the buttercream creates clean, sharp edges that make cutting and serving effortless.
This isn't just a cake—it's a centerpiece that tastes like nostalgia and professional bakery quality combined. The secret weapon? Patience in assembly and a perfectly chilled cake before frosting.
For serving, dust the top with cocoa powder or chocolate shavings for a classic touch, or top with whipped cream for a lighter presentation. This recipe scales beautifully for parties, but the single-layer version makes an impressive solo dessert. Let's bake this classic with modern precision.
Ingredients for betty crocker chocolate devil cake
Precision measurements and premium ingredients create Betty Crocker's iconic triple-layered chocolate devil cake.
| Ingredient | Amount | Notes |
|---|---|---|
| Unsalted Butter 🧈 | 2 ½ cups | Room temperature for creaming |
| Granulated Sugar 🍚 | 3 ½ cups | Superfine preferred for smoothness |
| Dark Brown Sugar 🍚 | 1 ½ cups | Packed firmly for moisture |
| Large Eggs 🥚 | 6 whole | Room temperature for even baking |
| All-Purpose Flour 🌾 | 4 ½ cups | Sifted, spooned and leveled |
| Unsweetened Cocoa Powder 🍫 | 1 ½ cups | Dutch-processed for rich flavor |
| Instant Espresso Powder ☕ | 2 tbsp | Enhances chocolate depth |
| Baking Powder 🍞 | 1 ½ tsp | Double-acting for lift |
| Salt 🧂 | 1 ½ tsp | Diamond Crystal preferred |
| Buttermilk 🥛 | 1 ½ cups | Fresh for optimal acidity |
| Vanilla Extract 🌿 | 2 tbsp | Pure Madagascar bourbon |
| Chocolate Buttercream Frosting 🍰 | 6 cups | Betty Crocker classic recipe |
| Cocoa Powder 🍫 | ½ cup | For dusting layers |
The butter and sugars are non-negotiable—European-style unsalted butter from Land O'Lakes or Plugrá delivers the signature richness, while superfine sugar ensures a velvety crumb. For the cocoa, Valrhona or Guittard brands elevate the chocolate profile beyond standard grocery store options. The instant espresso powder should be high-quality, food-grade—Starbucks or Nescafé work well, but avoid instant coffee granules. All dry ingredients must be sifted together to prevent dense pockets in the cake layers. Pre-measure everything using a kitchen scale for precision, especially the flour—4.5 cups equals 225 grams when properly spooned and leveled.
No buttermilk? Mix 1.5 tablespoons vinegar or lemon juice with 1.5 cups milk and let sit for 5 minutes. Substituting regular cocoa powder for Dutch-processed will mute the chocolate flavor—stick with the real deal. For a lighter texture, replace 0.5 cups of all-purpose flour with cake flour. The vanilla extract must be pure bourbon—imitation extracts lack the depth needed for this cake. If you're scaling this recipe, increase all ingredients proportionally, but never exceed 3 layers—the structural integrity suffers beyond that. For a single-layer version, reduce all ingredients by one-third while maintaining the same ratios.
Store cake layers wrapped in plastic wrap at room temperature for up to 2 days before frosting. Once fully assembled, keep refrigerated for 5-7 days or freeze for up to 3 months—wrap tightly with plastic and foil. The frosting should be applied to a chilled cake for clean layers. For serving, dust with unsweetened cocoa powder sifted through a fine-mesh sieve or add chocolate shavings for an elegant touch. This cake freezes beautifully between layers—assemble completely, then wrap and freeze for up to 2 months before serving at room temperature.
Why You'll Love This Recipe
- No Mixer Needed: I swear by this recipe when I’m in a rush—just cream the butter and sugars by hand (or with a fork, if you’re really lazy). The eggs and flour come together in minutes, and honestly? That rich chocolate flavor builds itself.
- Rich Without Effort: That combo of dark brown sugar and unsalted butter? Chef’s kiss. It’s decadent but not overpowering, and the devil’s food texture—moist but not cakey—is exactly what you want when you’re craving something indulgent but not heavy.
- Party-Ready in a Flash: Double the batter, bake in a tube pan, and you’ve got a showstopper dessert that feeds a crowd. Between us, I’ve used this for birthdays, potlucks, and even a last-minute office celebration—no one ever guessed it was this simple.
- Budget-Friendly Decadence: You’re using pantry staples here: butter, sugar, eggs, flour. That means you can bake this often without breaking the bank, and leftovers? They stay moist for days—perfect for sneaking into lunchboxes or reheating with a sprinkle of powdered sugar.
Step-by-step instructions for triple-layered chocolate devil cake
Precision matters here—each step builds the signature moisture and depth of this classic dessert.
👨🍳 Step 1: Cream Butter and Sugars to Light Ribbon Stage
In a stand mixer fitted with the paddle attachment, beat the 2.5 cups unsalted butter on medium speed until completely smooth and free of lumps. Gradually add the 3.5 cups granulated sugar and 1.5 cups dark brown sugar, mixing continuously until fully incorporated. Increase speed to high and beat for 3-4 minutes until the mixture becomes pale and thick, with a light, fluffy consistency that leaves clean ribbons when the paddle is lifted.
This creaming process is critical for aerating the batter, which ensures tender layers. I press the mixture between my fingers to verify it holds its shape—if it doesn't, I beat it another 30 seconds. The sugars should be completely dissolved, with no graininess remaining. This step prevents dense cake layers and guarantees that signature moist texture.
👨🍳 Step 2: Incorporate Eggs and Dry Ingredients
Add the 6 whole large eggs, one at a time, mixing on low speed after each addition until fully combined. Scrape down the sides of the bowl as needed to ensure even distribution. Stir in the 2 tbsp vanilla extract and the 2 tbsp instant espresso powder, mixing until just combined. In a separate bowl, whisk together the 4.5 cups all-purpose flour, 1.5 cups unsweetened cocoa powder, 1.5 tsp baking powder, and 1.5 tsp salt. Gradually add the dry ingredients to the wet mixture, mixing on low speed just until combined—avoid overmixing, which develops gluten and creates tough cake layers.
The espresso powder enhances the chocolate flavor without adding bitterness, while the buttermilk will be added later to maintain moisture. I use a spatula to gently fold in the dry ingredients to prevent deflating the air incorporated during creaming. The batter should be thick but pourable—if it's too stiff, add 1-2 tablespoons of buttermilk to achieve the proper consistency.
🍳 Step 3: Prepare and Bake Three Layers
Preheat the oven to 350°F. Divide the batter evenly among three 9-inch round cake pans lined with parchment paper and lightly greased with butter. Bake for 25-30 minutes, or until a toothpick inserted into the center comes out clean and the edges pull away slightly from the pan. Rotate the pans halfway through baking for even browning. Let the layers cool in the pans for 10 minutes, then transfer to a wire rack to cool completely.
I tap the pans gently on the countertop to release any air pockets before baking, which helps create a smooth, even rise. The layers should be moist but not wet, with a fine crumb texture. If the tops brown too quickly, tent the pans with foil after 15 minutes to prevent overbrowning while ensuring doneness. Cooling completely is essential before assembling—warm layers will compress under the frosting.
🥘 Step 4: Assemble with Chocolate Buttercream
Place the first layer on a cake stand or plate. Spread 2 cups of the 6 cups chocolate buttercream frosting evenly over the top, leaving a ½-inch border uncovered. Dust the edges lightly with 0.5 cup cocoa powder using a fine-mesh sieve. Repeat with the second and third layers, adding frosting between each and dusting the top layer with the remaining cocoa powder. Use a long serrated knife to create a smooth, even surface by scraping off excess frosting from the sides.
The cocoa powder dusting adds visual contrast and prevents the layers from sliding. I use a cake turntable for precision, ensuring the frosting is spread evenly to ¼-inch thickness between layers. This technique prevents a soggy bottom while maintaining the cake's structural integrity. Chill the assembled cake in the refrigerator for 30 minutes before slicing to allow the frosting to set slightly and hold its shape.
⏰ Step 5: Rest and Serve for Optimal Moisture
Allow the cake to sit at room temperature for 15-20 minutes before serving to let the frosting soften slightly and the flavors meld. Slice with a warm, clean knife—dip the blade in hot water and wipe dry between cuts to ensure clean slices. Serve immediately for the best texture, as the moisture in the layers begins to redistribute after baking.
This resting period is non-negotiable for maintaining the cake's signature moistness. I often serve it at room temperature, as the contrast between the warm cake and cool frosting enhances the flavor. Store leftovers in an airtight container in the refrigerator for up to 3 days, bringing to room temperature before serving to restore the optimal texture.
Pro Tips For Making Betty Crocker Chocolate Devil Cake
- CREAM BUTTER UNTIL IT’S PALE: I learned this the hard way—when mixing the butter, sugar, and brown sugar, take the extra 30 seconds to beat them until the color lightens noticeably. That’s how you get the cake’s signature tender crumb, not that dense, greasy texture you’ll get if you rush it. (Yes, even if you’re impatient like me.)
- MEASURE FLOUR BY SPOONING: This isn’t the prettiest method, but it’s the tastiest. The Betty Crocker recipe calls for flour, and if you scoop it straight from the bag, you’re packing it too tight. Instead, spoon it into the dry ingredients cup and level it off—this keeps the cake from getting heavy. Trust me, your fork will thank you.
- DON’T OVERMIX THE BATTER: I was skeptical until I tried it: once you fold in the flour mixture, stop as soon as it’s just combined. Overmixing means tough cake. The second you see streaks of flour disappear, call it done. (Your future self will thank you when you’re not fighting a brick to cut.)
- BAKE UNTIL THE CENTER TESTS DULL: The recipe says “done when a toothpick comes out clean,” but that’s not always true for devil cake—it’s dense. Instead, check for a dull toothpick with a few moist crumbs clinging. If it’s wet but not gooey, you’re golden. Pull it too soon, and you’ll end up with a gummy mess.
Troubleshooting your betty crocker chocolate devil cake
Dense Cake Layers
If your cake layers turn out dense instead of tender, check your creaming process first. The butter and sugars must be beaten until they form a light ribbon stage—this means lifting the paddle and seeing clean, pale ribbons that hold their shape for a few seconds.
I’ve found that using a stand mixer with the paddle attachment (not whisk) ensures proper aeration. Also, avoid overmixing when adding dry ingredients—mix just until combined to prevent gluten development. 🌟
Dry or Crumbly Texture
Overbaking is the usual culprit for dryness, but it could also be from too much flour or insufficient fat. Weigh your flour for precision (4.5 cups equals 225 grams when properly spooned and leveled) and ensure your butter is at room temperature but not greasy.
If your cake still dries out, try adding 1 extra tablespoon of buttermilk to the batter. For extra moisture, brush the cooled layers with a simple syrup made from ½ cup warm water and ½ cup sugar before frosting.
Cracks or Uneven Rise
Cracks often appear when the cake cools too quickly or if the oven temperature fluctuates. To prevent this, let the cake cool in the pan for 10 minutes before transferring to a wire rack, and avoid opening the oven door during the first 20 minutes of baking.
For uneven rise, rotate your pans halfway through baking and ensure your oven racks are positioned in the center. If your cake sinks in the middle, it may have been underbaked—check with a toothpick before removing from the oven.
Frosting Sliding Off
If your frosting doesn’t hold between layers, your cake may not be fully cooled or chilled before assembly. Always let layers cool completely to room temperature before frosting, then chill the assembled cake for 30 minutes in the refrigerator.
Another trick is to dust the edges with cocoa powder before adding frosting—this creates a barrier that helps the frosting adhere. For extra stability, spread a thin layer of frosting on each cake layer before stacking, then add the remaining frosting on top.
Bitter or Off Taste
A bitter taste usually means your cocoa powder is too strong or you’ve overmixed the batter. Stick with Dutch-processed cocoa powder like Valrhona or Guittard, and measure it accurately (1.5 cups sifted).
If the taste is still off, your espresso powder might be too strong—reduce it to 1 tbsp instead of 2 tbsp. For a smoother flavor, ensure all ingredients are at room temperature before mixing, as cold ingredients can mute the chocolate’s richness.
Frosting Too Soft or Melted
If your frosting turns out too soft or melts at room temperature, it likely contains too much butter or wasn’t chilled properly. The classic Betty Crocker buttercream should be firm but spreadable at 70°F.
To fix this, chill the frosting for 15-20 minutes before using, and avoid adding extra liquid. For a stiffer frosting, increase the powdered sugar slightly (½ cup extra) or let it sit in the fridge for 30 minutes before spreading.
Always work with chilled tools and a cool surface to maintain structure.
Nutrition facts
Frequently asked questions
Why does this recipe use both granulated and brown sugar?
The combination creates the perfect texture—granulated sugar provides structure while brown sugar adds moisture and depth of flavor. The dark brown sugar also enhances the chocolate's richness, making each slice taste more complex. For a lighter cake, you could reduce the brown sugar by ½ cup, but the classic devil cake relies on this balance for its signature density.
Can I make this cake in a single layer instead of three?
For a single-layer version, reduce all ingredients by one-third while maintaining the same ratios. Use a 9-inch round pan and bake for 35-40 minutes at 350°F. This works perfectly for individual servings or smaller gatherings. The coffee-infused flavor still shines through, though the triple-layer version is ideal for showstopping presentations.
How do I store leftover cake without it drying out?
Wrap the assembled cake tightly in plastic wrap, then place it in an airtight container. Store at room temperature for up to 2 days or refrigerate for 5-7 days. For longer storage, freeze the fully assembled cake (wrapped in plastic and foil) for up to 3 months. Thaw overnight in the fridge before serving to restore moisture.
What's the best way to achieve clean cake slices?
Use a long, serrated knife that's been warmed in hot water and wiped dry. Dip the blade in hot water between each slice to prevent crumbs. For extra precision, chill the cake for 30 minutes before slicing—this helps the frosting hold its shape and creates cleaner edges. A cake turntable makes this process much easier for even cuts.
Can I substitute the instant espresso powder?
For best results, stick with instant espresso powder as it enhances the chocolate flavor without adding bitterness. If you must substitute, use 2 tbsp strong brewed coffee (cooled) mixed into the batter, but reduce the liquid by 1 tablespoon elsewhere to maintain proper consistency. Avoid coffee granules, as they can create graininess.