
Desserts
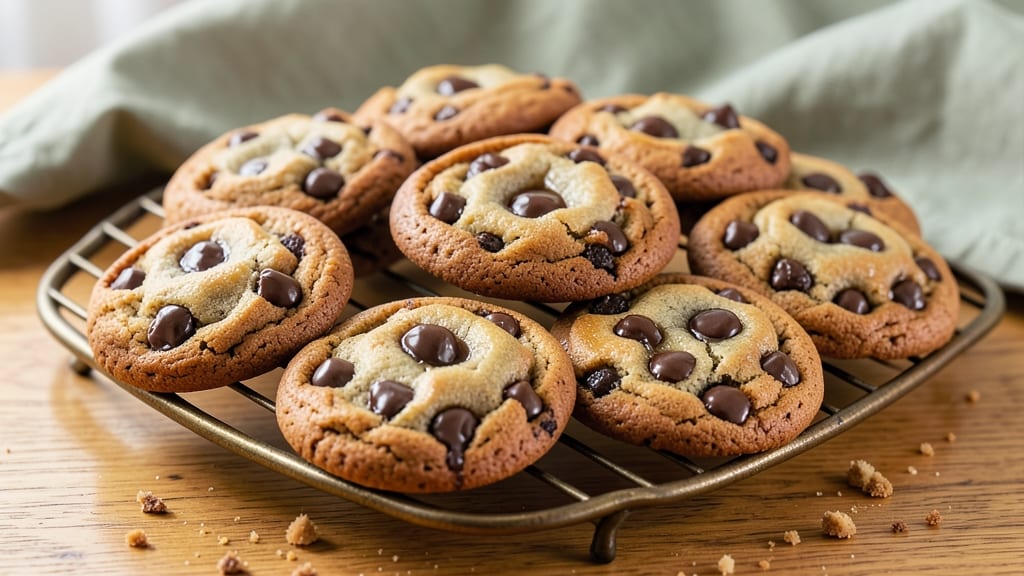
This burnt butter chocolate chip cookies recipe delivers a sophisticated twist on a classic treat—where smoky caramelized butter meets gooey chocolate chunks in every bite.
The secret lies in cooking the butter until it reaches that golden, nutty stage before mixing, creating a depth of flavor that transforms ordinary cookies into something extraordinary. I’ve perfected this technique over years of baking, and the results are worth every minute of patience.
What sets these cookies apart is the textural contrast: crisp edges give way to a chewy center, while the burnt butter adds a rich, almost toffee-like flavor that pairs beautifully with the sweetness of chocolate.
The process is simpler than it sounds—just melt the butter to the right consistency, mix with your favorite ingredients, and bake until golden. No fancy equipment required, just attention to detail.
By the time they emerge from the oven, your cookies will be caramelized at the edges, with pockets of molten chocolate and that irresistible burnt butter aroma filling your kitchen.
The contrast of flavors—smoky, sweet, and salty—makes these cookies impossible to resist. Serve them warm, dusted with powdered sugar or a sprinkle of flaky sea salt for the ultimate finishing touch.
These cookies are perfect for holiday gatherings, potlucks, or simply treating yourself to something special. The burnt butter technique elevates them beyond basic chocolate chip cookies, making them a standout dessert that’s sure to impress. Let’s get baking!
Ingredients for burnt butter chocolate chip cookies
Smoky butter, rich chocolate, and crisp edges—here's what makes these cookies unforgettable.
| Ingredient | Amount | Notes |
|---|---|---|
| Unsalted Butter 🧈 | 1 ½ cups | Melted to golden brown stage |
| Granulated Sugar 🍚 | 1 cup | White or light brown preferred |
| Packed Brown Sugar 🍚 | ½ cup | For chewy texture |
| Large Eggs 🥚 | 2 whole | Room temperature for even mixing |
| Vanilla Extract 🌿 | 2 tsp | Pure vanilla preferred |
| All-Purpose Flour 🌾 | 2 ½ cups | Sifted for light texture |
| Baking Soda 🧂 | ½ tsp | Ensures proper rise |
| Diamond Crystal Kosher Salt 🧂 | ½ tsp | Fine grain preferred |
| Chocolate Chips 🍫 | 2 cups | Semi-sweet preferred |
| Flaky Sea Salt 🧂 | ¼ tsp | For finishing touch |
| Powdered Sugar 🍚 | ½ cup | Optional for dusting |
The butter is everything here. European-style unsalted butter (like Plugrá) gives the best flavor, but any good brand works. Melt it in a light-colored saucepan over medium heat, swirling constantly until it turns golden brown with nutty aroma—about 5-7 minutes. Watch closely after it starts bubbling, or it'll burn. The Whole Foods bulk section or Trader Joe's carry excellent options if you want to splurge. For chocolate chips, Ghirardelli semi-sweet or Enjoy Life brand (allergy-friendly) are my go-tos, but any quality brand does the trick.
No vanilla extract? Vanilla bean paste works even better, or a splash of bourbon for depth. Short on brown sugar? Substitute white sugar plus 1 tsp molasses for that caramel-like flavor. The flour must be sifted—King Arthur or Gold Medal are my picks for consistent results. For texture, I always use Diamond Crystal kosher salt (it's finer than Morton) and toast the chocolate chips in the oven for 3-4 minutes before mixing—they melt slightly and create pockets of gooey goodness. If you're feeling fancy, swap half the chocolate chips for dark chocolate chunks or white chocolate pairs.
Store the dough in an airtight container for up to 3 days—it actually improves overnight. Baked cookies keep for 5 days at room temperature, but they're best enjoyed fresh. For make-ahead baking, portion the dough into balls, freeze on a tray, then transfer to a bag. Bake straight from frozen, adding 1-2 extra minutes. These cookies reheat beautifully—10 seconds in the microwave restores that warm, gooey magic. I always bake a batch on Sunday and keep them in a decorative tin for snacking all week.
Why You'll Love This Recipe
- No Mixer Needed: I swear by this recipe when my mixer’s on the fritz—just cream the butter and sugars by hand until it’s light, not greasy. The brown sugar’s stickiness does half the work for you, and those eggs? They keep everything tender even if you’re not a mixing pro.
- Nutty, Caramelized Magic: That burnt butter—yes, you’re supposed to let it brown—adds this deep, toasty richness that cuts through the sweetness. It’s like someone took a classic chocolate chip and gave it a grown-up upgrade, but honestly? My kids don’t even notice the sophistication.
- Bakes Like a Dream: Ten minutes in the oven, and you’ve got cookies with crisp edges and chewy centers. No waiting around, no sad flat cookies—just perfect every time. I double the batch on Sundays and freeze half; they thaw in minutes and taste like they just came out.
- Budget-Friendly Luxury: You’re using pantry staples here—good butter, basic sugars, vanilla—and the flavor punches way above its price. I make these for holiday gifts, and people think I slaved over them. Between us? The hardest part’s picking which jar to put them in.
Step-by-step instructions for burnt butter chocolate chip cookies
Here's how to transform simple ingredients into cookies with that coveted smoky, caramelized butter flavor.
Caramelize the Butter to Perfection
In a heavy-bottomed saucepan, melt the 1.5 cups unsalted butter over medium-low heat. Watch closely as it begins to foam and bubble—this is where the magic happens. Let it cook undisturbed until it turns a deep golden brown color, about 8-10 minutes. You'll smell that unmistakable nutty aroma, and tiny browned bits will form at the bottom.
Here's the thing—don't walk away. If the butter burns, you'll taste bitterness instead of that rich caramelized flavor. Once it reaches that perfect golden brown stage with visible browned bits, immediately remove it from heat and let it cool for 5 minutes. This cooling step is crucial because hot butter will cook the eggs immediately when mixed, creating scrambled eggs instead of a smooth dough.
Cream the Butter with Sugars
While the butter cools, transfer it to the bowl of a stand mixer fitted with the paddle attachment. Add the 1 cup granulated sugar and 0.5 cup packed brown sugar. Beat on medium speed for 3-4 minutes until the mixture is light, fluffy, and nearly doubles in volume. You're looking for a pale, ribbon-like consistency that leaves clean streaks when the paddle is lifted.
This creaming process incorporates air into the dough, which creates those signature crackly tops and helps the cookies spread just enough. I've found that using both white and brown sugar gives you the perfect balance of crisp edges and chewy centers. If your butter has cooled completely, you can gently warm it for 10 seconds in the microwave to make mixing easier.
Mix in Eggs and Flavorings
Add the 2 whole large eggs one at a time, mixing on low speed for 30 seconds after each addition until fully incorporated. Then add the 2 teaspoons vanilla extract and mix for another 10 seconds. The mixture should look slightly thickened but still smooth. If it looks curdled, don't worry—it'll come together when you add the dry ingredients.
Real talk: room temperature eggs mix better and create a smoother dough. If your eggs are straight from the fridge, let them sit in warm water for 5 minutes first. The vanilla extract should be pure, not imitation—you'll taste the difference in these rich cookies.
Combine Dry Ingredients and Chocolate
In a separate bowl, whisk together the 2.5 cups all-purpose flour, 0.5 teaspoon baking soda, and 0.5 teaspoon diamond crystal kosher salt. Add this mixture to the wet ingredients and mix on low speed for 30-45 seconds until just combined. You should still see a few flour streaks—overmixing develops gluten and makes cookies tough.
Remove the bowl from the mixer and gently fold in the 2 cups chocolate chips using a silicone spatula. Make sure they're evenly distributed throughout the dough. I like to use a mix of semi-sweet and dark chocolate chips for depth of flavor, but feel free to use all semi-sweet if that's what you have on hand.
Chill and Shape the Dough
Cover the bowl with plastic wrap and refrigerate the dough for at least 30 minutes (I prefer 1 hour or even overnight). Chilling solidifies the butter, which prevents the cookies from spreading too thin in the oven. It also allows the flour to fully hydrate, creating better texture. If you're in a hurry, you can freeze the dough for 20 minutes instead.
Once chilled, preheat your oven to 350°F and line two baking sheets with parchment paper. Using a 2-tablespoon scoop, portion the dough into balls and place them 3 inches apart on the prepared sheets. The dough will be cold and slightly firm—this is normal and ensures even baking.
Bake to Golden Perfection
Bake the cookies for 11-13 minutes until the edges are golden brown but the centers still look slightly underdone. They'll continue cooking on the hot pan after you remove them from the oven. Let them cool on the baking sheet for 5 minutes before transferring to a wire rack.
While they're still warm, sprinkle each cookie with a pinch of 0.25 teaspoon flaky sea salt and, if using, dust with 0.5 cup powdered sugar. The salt enhances the caramelized butter flavor, and the powdered sugar adds that classic cookie look. Enjoy them warm for the ultimate experience—each bite delivers that smoky, caramelized butter flavor with gooey chocolate chunks.
Pro Tips For Making Burnt Butter Chocolate Chip Cookies
- Brown Butter First: Take that butter straight from the fridge—cold, firm, and unsalted—and melt it in a light-colored pan over medium heat. Watch it foam, then turn golden brown with nutty aroma before removing it from heat. (Yes, it’ll look weird when it separates, but that’s the point.)
- Whisk Eggs Like a Pro: Crack eggs into a bowl, add vanilla, and whisk hard for 30 seconds—until the yolks and whites blend completely. No streaks, no lumps. (I used to rush this and ended up with cookies that tasted like scrambled eggs.)
- Skip the Overmixing: Once you fold in flour, chocolate chips, and browned butter, stop as soon as the dough comes together. Overmixing = tough cookies. (Your dough will look shaggy, but that’s how you know it’s right.)
- Use a Timer for 350°F: Preheat your oven to 350°F and set a timer for 10–12 minutes. Pull them out when edges are golden but centers still look soft—they’ll firm up as they cool. (Burnt edges mean you waited too long.)
Dietary considerations for this burnt butter chocolate chip cookies
Gluten-Free Adaptation
For a gluten-free version, replace the 2.5 cups all-purpose flour with a 1:1 gluten-free baking flour blend like King Arthur Measure for Measure or Bob's Red Mill 1-to-1. Add 1 teaspoon xanthan gum to help bind the dough—this is crucial for maintaining texture.
Chill the dough 30 minutes longer since gluten-free flours absorb moisture differently. Bake at 350°F for 12-14 minutes as they spread less than traditional cookies. 🌾
Vegan Butter Substitute
Swap the butter for 1.5 cups vegan butter like Miyoko's Creamery or Earth Balance, but caramelize it over medium heat for 5-7 minutes until golden. Use flax eggs (2 tbsp ground flaxseed + 6 tbsp water per egg) to replace the eggs.
For binding, add 1 tablespoon cornstarch to the dry ingredients. The texture will be slightly denser but still delicious with that burnt butter flavor. 🧈
Lower Sugar Options
Reduce the sugar by 25% (use 0.75 cup granulated and 0.375 cup brown sugar) and replace the rest with 0.5 cup unsweetened applesauce or mashed banana. This keeps the cookies moist while cutting calories.
For extra flavor, add 1 teaspoon cinnamon to the dry ingredients. The burnt butter flavor will still shine, but with a lighter sweetness profile. 🍎
Nut-Free Chocolate
If avoiding nuts, use Enjoy Life brand chocolate chips (certified nut-free) or Ghirardelli dairy-free chocolate chunks. For an extra boost, fold in 0.5 cup dairy-free white chocolate chips to balance the richness.
These chips melt beautifully and create pockets of gooey goodness without any nut risk. Always check labels for cross-contamination warnings. 🍫
Dairy-Free Chocolate
For a fully dairy-free version, use dairy-free chocolate chips like Pascha or Hu Kitchen brands. Replace the butter with coconut oil (melted and caramelized) or vegan butter as mentioned earlier.
The texture will be slightly firmer but still achieve that signature burnt flavor. Pair with almond-free sea salt for a safe finishing touch. 🌱
Nutrition facts
Frequently asked questions
Why does my butter burn before reaching that golden brown stage?
This happens when the heat is too high or you're not paying close attention. Use medium-low heat and watch constantly after the butter starts bubbling. For best results, use a light-colored saucepan so you can see the color changes clearly. If it starts to smoke, remove it immediately and let it cool before trying again.
Can I make these cookies without burnt butter?
Yes! If you prefer a milder flavor, simply melt the butter until it's fully liquid (about 3-5 minutes) without letting it brown. The cookies will still be delicious, just with a more classic chocolate chip flavor. The burnt butter is what gives these cookies that special smoky depth, but it's not mandatory.
How do I prevent my cookies from spreading too much?
Chilling the dough is key—refrigerate for at least 1 hour (or overnight) to firm up the butter. Also use a 2-tablespoon scoop for dough balls and place them 3 inches apart on the baking sheet. For extra control, bake at 350°F instead of higher heat, and don't overbake.
What's the best way to store these cookies?
Keep them in an airtight container at room temperature for up to 5 days. For longer storage, freeze baked cookies for up to 3 months. To reheat, microwave for 10-15 seconds or warm in a 300°F oven for 5 minutes to restore that fresh-baked texture.
Can I add other mix-ins besides chocolate chips?
Try toasted nuts (like pecans or walnuts), dried cranberries, or white chocolate pairs. For a festive twist, fold in crushed candy canes during the holidays. Just keep the total mix-ins to 1 cup to maintain the right texture balance.